自制LinuxContainer
预备知识
进程和clone系统调用
进程(Process)是运行中的程序实例,又可以称为任务(Task),进程在Linux内核中使用一个PCB来表示,主要包含运行状态、信号、进程号、父进程号、运行时间累计值、正在使用的文件(文件描述符表)、本任务的局部描述符及任务状态段信息。
不同于fork,clone系统调用允许子进程共享部分父进程的上下文,如内存空间、文件描述符表、信号等。
1 | /* Prototype for the glibc wrapper function */ |
clone常用于实现多线程,因为子进程和父进程可以共享内存。
不同于fork创建的子进程会从调用的位置开始执行,clone创建的子进程会执行实参传入的fn(arg),并将实参中的arg传入。
当fn(arg)返回后子进程页会终止,返回值即为子进程的exit code,当然子进程在遇到显式的exit调用或终止信号也会立刻退出。
子进程与父进程共享内存,它们不能(也不应该)使用同一个栈,因此必须使用child_stack参数指定子进程使用的栈所在的内存空间。栈是从上向下生长的,因此最好指定最顶层的一个地址。flags的低位包含子进程退出了发送给父进程的信号,If this signal is specified as anything other than SIGCHLD, then the parent process must specify the __WALL or __WCLONE options when waiting for the child with wait(2). If no signal is specified, then the parent process is not signaled when the child terminates.flags 还可以指定子进程和父进程间可以共享的内容,具体内容见man clone。
虚拟网络设备和veth pair
Linux container 中用到一个叫做veth的东西,这是一种新的设备,专门为 container 所建。veth 从名字上来看是 Virtual ETHernet 的缩写,它的作用很简单,就是要把从一个 network namespace 发出的数据包转发到另一个 namespace。veth 设备是成对的,一个是 container 之中,另一个在 container 之外,即在真实机器上能看到的。
veth设备实现原理
VETH设备总是成对出现,送到一端请求发送的数据总是从另一端以请求接受的形式出现。创建并配置正确后,向其一端输入数据,VETH会改变数据的方向并将其送入内核网络子系统,完成数据的注入,而在另一端则能读到此数据。(Namespace,其中往veth设备上任意一端上RX到的数据,都会在另一端上以TX的方式发送出去)veth工作在L2数据链路层,veth-pair设备在转发数据包过程中并不串改数据包内容。
这里写图片描述
显然,仅有veth-pair设备,容器是无法访问网络的。因为容器发出的数据包,实质上直接进入了veth1设备的协议栈里。如果容器需要访问网络,需要使用bridge等技术,将veth1接收到的数据包通过某种方式转发出去。
VETH: Typically used when you are trying to connect two entities which would want to “get hold of” (for lack of better phrase) an interface to forward/receive frames. These entities could be containers/bridges/ovs-switch etc. Say you want to connect a docker/lxc container to OVS. You can create a veth pair and push the first interface to the docker/lxc (say, as a phys interface) and push the other interface to OVS. You cannot do this with TAP.
veth设备特点
- veth和其它的网络设备都一样,一端连接的是内核协议栈
- veth设备是成对出现的,另一端两个设备彼此相连
- 一个设备收到协议栈的数据发送请求后,会将数据发送到另一个设备上去
常用命令
1 | # 创建veth |
其他细节见Linux篇《虚拟化-网络设备》
资源隔离、namespace和cgroup
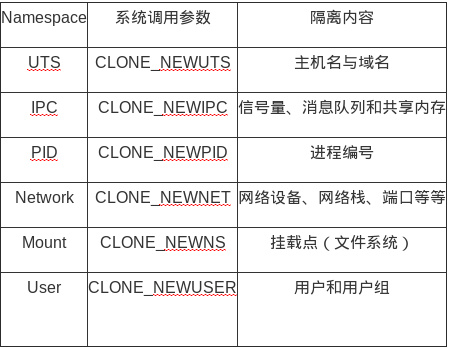
namespace的主要作用是对两个系统内的标识符的命名进行隔离,namespace有以下几种。
这几个flag 可以在调用clone进行进程创建的时候作为参数传入,从而实现namespace的隔离,从这个角度来说,container主要是进程角度的隔离,而不是传统的虚拟机(一些虚拟机实现同样是基于对操作系统层的虚拟化,所以应该和container是类似的,比如普通vmware),因为container底层用的是同一个内核来调度。
cgroup 是linux 内核的另外一个控制和隔离进程的特性,他分为cpu ,memory,net,io等几个子系统,从而实现对进程cpu,内存,磁盘,网络等资源使用的控制。
虚拟文件系统(VFS)和chroot
将根目录设置成另外一个目录
自制容器
docker 只是一个工具,container 技术的核心还是linux 内核的cgroup + chroot + namespace 技术。
制作image
制作自己容器,需要一个image ,可以从网上下一个,也可以自己制作,制作很简单,新装一个操作系统,安装一些需要用到的软件包,然后用tar 制作 / 目录下的压缩包,去掉一些虚拟文件系统的文件,本文用的是自己制作的centos 6.5 的image。
容器实现过程
容器实现过程可以归纳为
- 用clone系统调用创建子进程,传入namespace的那几个参数,实现namespace的隔离;
- 父进程中创建veth pair ,一个veth在自己的namespace,将另一个设置为子进程的namespace,实现container和宿主机的网络通信;
- 父进程创建cgroup memory和cpuset子系统,将子进程attach到cgroup子系统上,实现container 的资源限制和隔离;
- 子进程在自己的namespace里,设置主机名,mount proc虚拟文件系统,设置veth ip,chroot到centos 6镜像的位置, 最终将进程镜像替换成/bin/bash;
- 父进程调用waitpid 等待子进程退出。
容器实现
见下面的《源码》部分
实验
在解压好镜像后,该镜像根目录下可能还没有必须的命令文件及其依赖的动态链接库,主要是由于用chroot改变根目录后,原来路径下的一些文件在当前镜像内都找不到了,一般安装完操作系统后这些文件应该都安装好了,如果需要可以通过手动移动来解决。
1 | ldd /bin/bash |
编译执行容器代码。
1 | gcc lxc_demo.c -o lxc_demo -lcgroup |
接下来分别在宿主机和容器内执行命令,可以得出一些结论:
- 容器和宿主机镜像可能不同,但是内核相同;
1
2
3
4
5
6
7# (宿主机内)
hgc@hgc-X555LD:~$ uname -r
4.13.0-45-generic
# (容器内)
bash-4.4# uname -r
4.13.0-45-generic - 根目录下的文件不同;
1
ls /
- hostname,宿主机内为用户设定的主机名,容器内为mydocker,说明UTS namespace隔离成功;
1
hostname
- 网络方面有回环网络卡lo和veth1,veth1 169.254.1.2 能ping 通veth0的地址(宿主机上的veth)169.254.2.1,如果在外面加iptables 做nat 转换的话,container里面还可以和外面通信。我们看不到外面宿主机的eth0 和 eth1,说明container 的network namespace 隔离成功。
1
2
3
4
5
6
7
8
9
10
11
12
13
14
15
16
17
18
19
20
21
22
23
24
25
26
27
28
29# (宿主机内)
$ ip addr
......
19: veth0@if18: <BROADCAST,MULTICAST,UP,LOWER_UP> mtu 1500 qdisc noqueue state UP group default qlen 1000
link/ether 46:c0:eb:a8:34:8d brd ff:ff:ff:ff:ff:ff link-netnsid 0
inet 169.254.1.1/30 scope global veth0
valid_lft forever preferred_lft forever
inet6 fe80::44c0:ebff:fea8:348d/64 scope link
valid_lft forever preferred_lft forever
# (容器内)网络方面有回环网络卡lo和veth1
bash-4.4# ip addr
1: lo: <LOOPBACK,UP,LOWER_UP> mtu 65536 qdisc noqueue state UNKNOWN group default qlen 1000
link/loopback 00:00:00:00:00:00 brd 00:00:00:00:00:00
inet 127.0.0.1/8 scope host lo
valid_lft forever preferred_lft forever
inet6 ::1/128 scope host
valid_lft forever preferred_lft forever
18: veth1@if19: <BROADCAST,MULTICAST,UP,LOWER_UP> mtu 1500 qdisc noqueue state UP group default qlen 1000
link/ether ce:04:78:b6:5a:2d brd ff:ff:ff:ff:ff:ff link-netnsid 0
inet 169.254.1.2/30 scope global veth1
valid_lft forever preferred_lft forever
inet6 fe80::cc04:78ff:feb6:5a2d/64 scope link
valid_lft forever preferred_lft forever
# 尝试ping宿主机上的veth0设备
bash-4.4# ping 169.254.1.1
PING 169.254.1.1 (169.254.1.1) 56(84) bytes of data.
64 bytes from 169.254.1.1: icmp_seq=1 ttl=64 time=0.101 ms
...... - 目前container 里面只有/bin/bash , 且进程号为 1,不是我们常见的init进程,或者systemd 。因为/bin/bash 为该namespace 下的第一个进程,说明我们的pid namespace隔离成功。
1
2
3
4
5# 查看进程
bash-4.4# ps -aux
USER PID %CPU %MEM VSZ RSS TTY STAT START TIME COMMAND
0 1 0.0 0.0 9924 3264 ? S 01:02 0:00 /bin/bash
0 8 0.0 0.0 30524 2820 ? R+ 01:02 0:00 ps -aux - mount 显示挂载的文件系统,和宿主机的不一样,说明mount namespace隔离成功。
1
2
3
4# 查看挂载情况(这里有点问题,原文里还有rootfs、sysfs等)
bash-4.4# mount
proc on /proc type proc (rw,relatime)
...... - 就cgroup的隔离情况来说,在cgroup文件系统内,memory的限制是我们设置的512M,cpu使用的是0-1号。从下面执行情况可以看出,只有0号和1号cpu idle为0 ,其他的都接近100%,说明cgroup隔离效果是很好的。
1
2
3
4
5
6
7
8
9hgc@hgc-X555LD:~/tools/virtualmachines/ubuntu-16.04$ cd /sys/fs/cgroup/memory/mydocker_1530580167/
hgc@hgc-X555LD:/sys/fs/cgroup/memory/mydocker_1530580167$ cat memory.limit_in_bytes
536870912
hgc@hgc-X555LD:/sys/fs/cgroup/memory/mydocker_1530580167$ cd /sys/fs/cgroup/cpuset/mydocker_1530580167/
hgc@hgc-X555LD:/sys/fs/cgroup/cpuset/mydocker_1530580167$ cat cpuset.cpus
0-1
hgc@hgc-X555LD:/sys/fs/cgroup/cpuset/mydocker_1530580167$ cat cpuset.mems
0
hgc@hgc-X555LD:/sys/fs/cgroup/cpuset/mydocker_1530580167$ top1
2
3
4
5
6
7
8
9
10
11
12
13
14
15
16
17
18
19
20
21
22
23
24
25
26
27
28
29
30
31
32
33
34
35
36
37
38
39
40
41
42
43# (宿主机内)执行top命令并点击1查看CPU负载情况
hgc@hgc-X555LD:/sys/fs/cgroup/cpuset/mydocker_1530580167$ top
top - 10:02:22 up 13:19, 1 user, load average: 0.74, 0.68, 0.72
Tasks: 348 total, 1 running, 346 sleeping, 0 stopped, 1 zombi
%Cpu0 : 5.3 us, 2.3 sy, 0.0 ni, 91.7 id, 0.0 wa, 0.0 hi, 0.7
%Cpu1 : 8.3 us, 12.6 sy, 0.0 ni, 78.8 id, 0.0 wa, 0.0 hi, 0.3
%Cpu2 : 4.0 us, 2.0 sy, 0.0 ni, 93.9 id, 0.0 wa, 0.0 hi, 0.0
%Cpu3 : 3.0 us, 2.4 sy, 0.0 ni, 94.6 id, 0.0 wa, 0.0 hi, 0.0
%Cpu4 : 7.1 us, 5.7 sy, 0.0 ni, 87.2 id, 0.0 wa, 0.0 hi, 0.0
%Cpu5 : 4.4 us, 1.4 sy, 0.0 ni, 93.9 id, 0.3 wa, 0.0 hi, 0.0
%Cpu6 : 3.3 us, 2.7 sy, 0.0 ni, 93.7 id, 0.0 wa, 0.0 hi, 0.3
%Cpu7 : 3.7 us, 1.3 sy, 0.0 ni, 94.6 id, 0.0 wa, 0.0 hi, 0.3
......
# (容器内)执行多个死循环任务,强行使CPU忙碌
bash-4.4# while true; do echo > /dev/null; done &
[1] 10
bash-4.4# while true; do echo > /dev/null; done &
[2] 11
bash-4.4# while true; do echo > /dev/null; done &
[3] 12
bash-4.4# while true; do echo > /dev/null; done &
[4] 13
bash-4.4# while true; do echo > /dev/null; done &
[5] 14
bash-4.4# while true; do echo > /dev/null; done &
[6] 15
bash-4.4# while true; do echo > /dev/null; done &
[7] 16
# (宿主机内)同样是执行top命令并点击1,可以看到头两个CPU的负载情况有了明显变化
hgc@hgc-X555LD:/sys/fs/cgroup/cpuset/mydocker_1530580167$ top
top - 10:05:05 up 13:22, 1 user, load average: 4.25, 1.68, 1.06
Tasks: 355 total, 1 running, 353 sleeping, 0 stopped, 1 zombi
%Cpu0 : 9.9 us, 34.8 sy, 0.0 ni, 53.2 id, 2.0 wa, 0.0 hi, 0.0
%Cpu1 : 14.4 us, 43.6 sy, 0.0 ni, 40.2 id, 1.7 wa, 0.0 hi, 0.0
%Cpu2 : 2.2 us, 0.6 sy, 0.0 ni, 92.0 id, 0.0 wa, 0.0 hi, 5.1
%Cpu3 : 2.6 us, 1.3 sy, 0.0 ni, 95.0 id, 0.0 wa, 0.0 hi, 1.0
%Cpu4 : 6.4 us, 10.0 sy, 0.0 ni, 83.6 id, 0.0 wa, 0.0 hi, 0.0
%Cpu5 : 2.3 us, 1.2 sy, 0.0 ni, 95.3 id, 0.0 wa, 0.0 hi, 1.2
%Cpu6 : 1.7 us, 0.7 sy, 0.0 ni, 97.6 id, 0.0 wa, 0.0 hi, 0.0
%Cpu7 : 2.0 us, 2.7 sy, 0.0 ni, 95.3 id, 0.0 wa, 0.0 hi, 0.0
......
源码
1 | #define _GNU_SOURCE |