(或直接修改 redis.conf 中 protected-mode 或在运行服务器的配置中加上–protected-mode no 或 Setup a bind address or an authentication password) 然后注释掉 redis.conf 中的 bind 127.0.0.1,或者在后面添上本机的 ip
普通单例连接
1 2 3 4 5
Jedis jedis = new Jedis(host, 6379); jedis.set("name", "bar"); String name = jedis.get("name"); System.out.println(name); jedis.close();
使用连接池连接
1 2 3 4 5 6 7 8 9 10 11 12 13
// 配置连接池 JedisPoolConfig config = new JedisPoolConfig(); config.setMaxTotal(30); // 最大连接数 config.setMaxIdle(2); // 最大连接空闲数 JedisPool pool = new JedisPool(config, host, 6379); // 从连接池中获取连接 Jedis jedis = pool.getResource(); jedis.set("name", "李四"); String name = jedis.get("name"); System.out.println(name); // 关闭,返回到连接池 jedis.close();
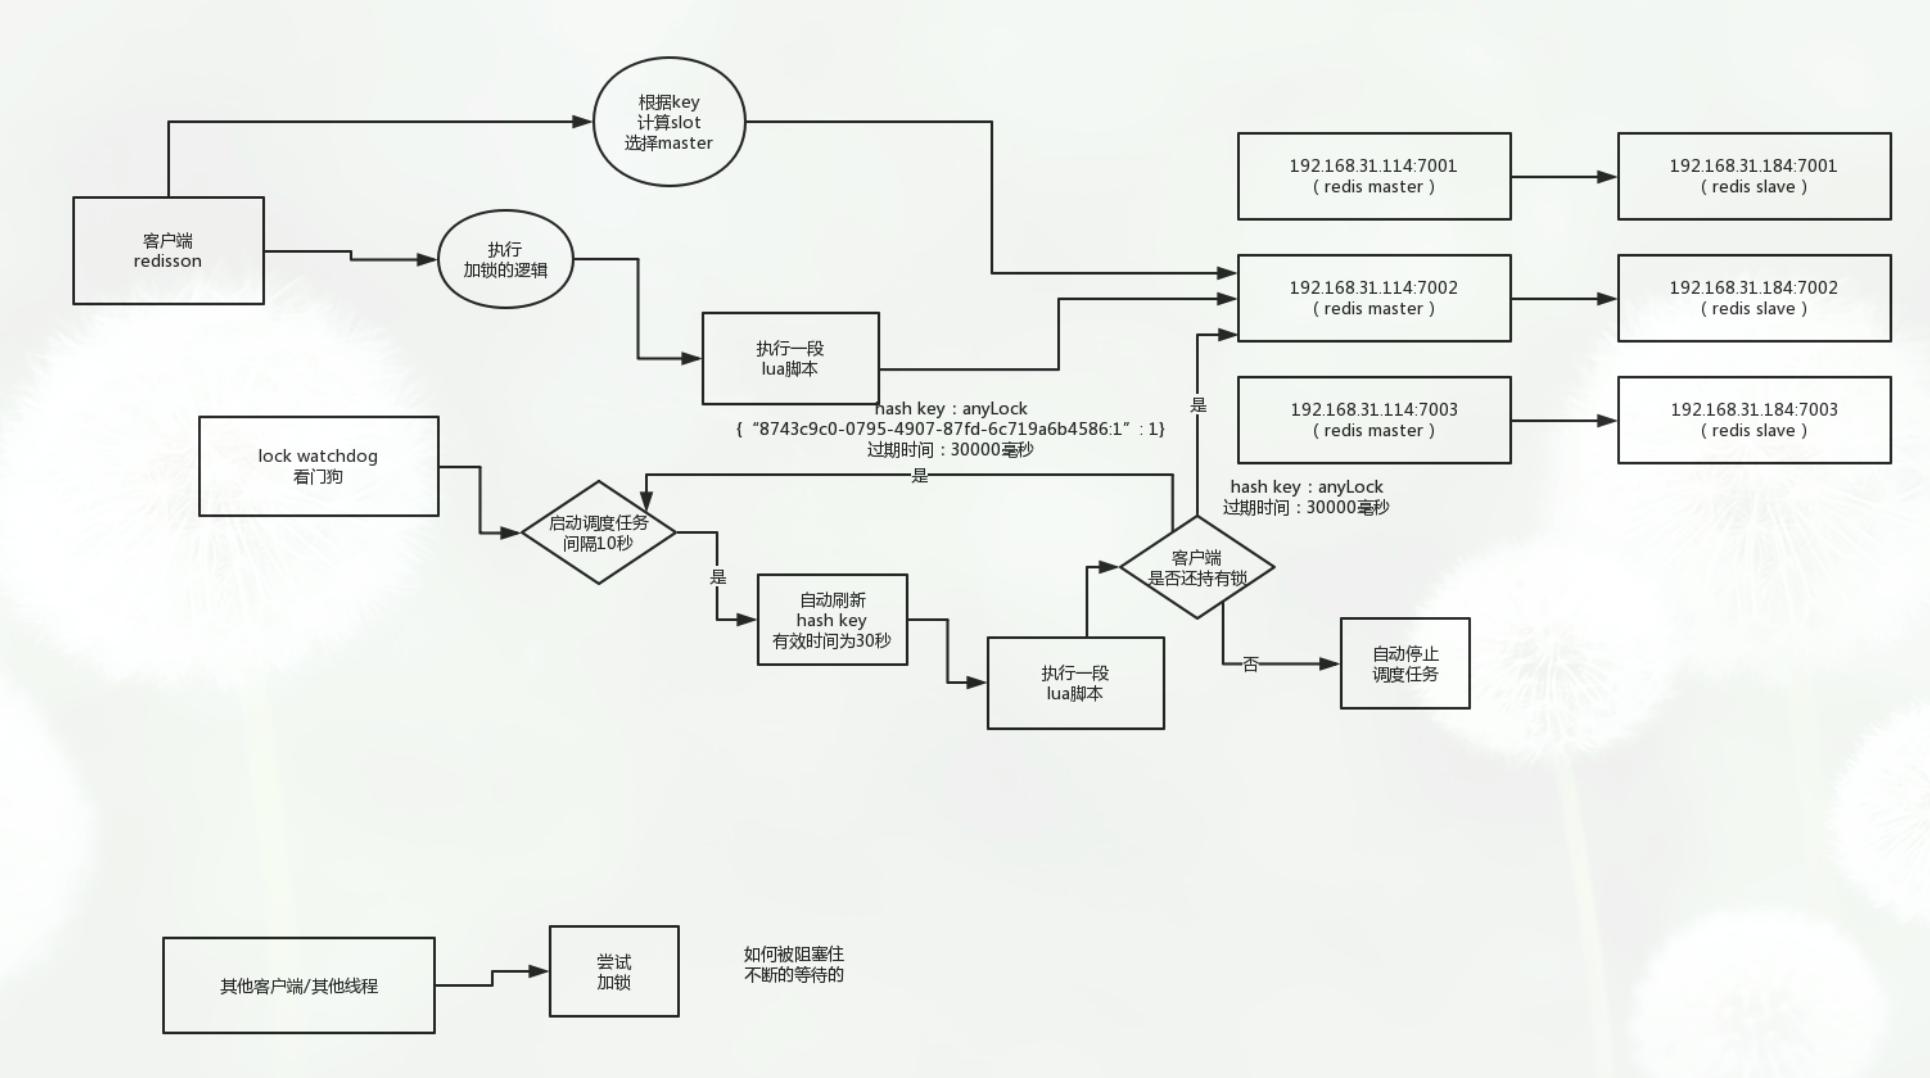
当然必须在 Spring 配置文件中引入属性文件扫描标签 4.在 Spring 配置文件中引入 redis 问题 ERR Client sent AUTH, but no password is set 因为 redis 没有配置密码而建立连接时却发送了密码,所以出错,解决办法是在下面 jedisConnectionFactory 标签中去掉 password 属性
@Override public int calcSlot(String key) { ... // slot的计算方法,注意这里的MAX_SLOT是固定的 int result = CRC16.crc16(key.getBytes()) % MAX_SLOT; log.debug("slot {} for {}", result, key); return result; }
// remove stale threads "while true do " + "local firstThreadId2 = redis.call('lindex', KEYS[2], 0);" + "if firstThreadId2 == false then " + "break;" + "end;" +
"local timeout = tonumber(redis.call('zscore', KEYS[3], firstThreadId2));" + "if timeout <= tonumber(ARGV[4]) then " + // remove the item from the queue and timeout set // NOTE we do not alter any other timeout "redis.call('zrem', KEYS[3], firstThreadId2);" + "redis.call('lpop', KEYS[2]);" + "else " + "break;" + "end;" + "end;" +
// check if the lock can be acquired now "if (redis.call('exists', KEYS[1]) == 0) " + "and ((redis.call('exists', KEYS[2]) == 0) " + "or (redis.call('lindex', KEYS[2], 0) == ARGV[2])) then " +
// remove this thread from the queue and timeout set "redis.call('lpop', KEYS[2]);" + "redis.call('zrem', KEYS[3], ARGV[2]);" +
// decrease timeouts for all waiting in the queue "local keys = redis.call('zrange', KEYS[3], 0, -1);" + "for i = 1, #keys, 1 do " + "redis.call('zincrby', KEYS[3], -tonumber(ARGV[3]), keys[i]);" + "end;" +
// acquire the lock and set the TTL for the lease "redis.call('hset', KEYS[1], ARGV[2], 1);" + "redis.call('pexpire', KEYS[1], ARGV[1]);" + "return nil;" + "end;" +
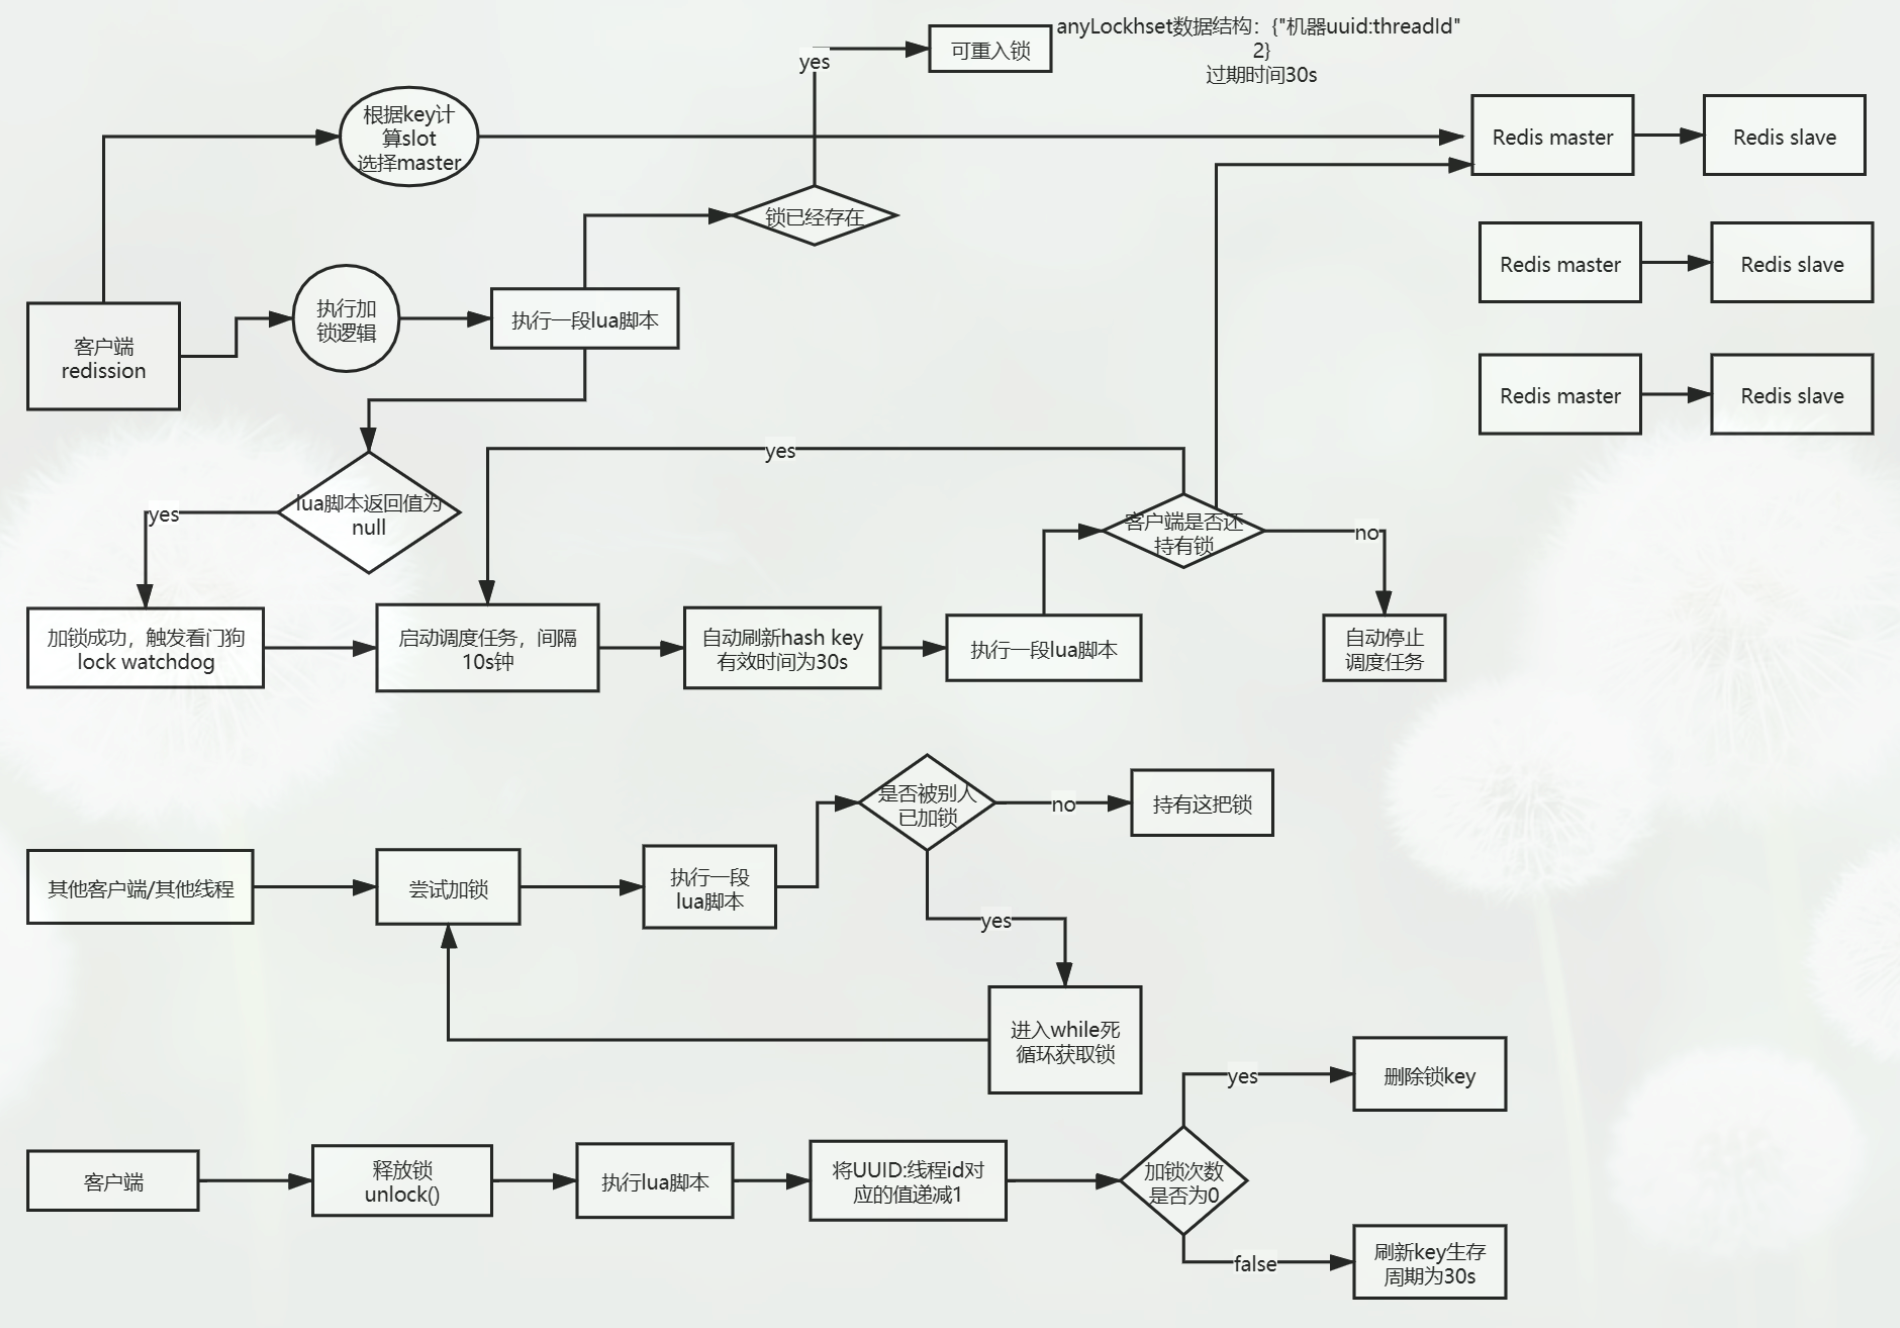
// check if the lock is already held, and this is a re-entry "if redis.call('hexists', KEYS[1], ARGV[2]) == 1 then " + "redis.call('hincrby', KEYS[1], ARGV[2],1);" + "redis.call('pexpire', KEYS[1], ARGV[1]);" + "return nil;" + "end;" +
// the lock cannot be acquired // check if the thread is already in the queue "local timeout = redis.call('zscore', KEYS[3], ARGV[2]);" + "if timeout ~= false then " + // the real timeout is the timeout of the prior thread // in the queue, but this is approximately correct, and // avoids having to traverse the queue "return timeout - tonumber(ARGV[3]) - tonumber(ARGV[4]);" + "end;" +
// add the thread to the queue at the end, and set its timeout in the timeout set to the timeout of // the prior thread in the queue (or the timeout of the lock if the queue is empty) plus the // threadWaitTime "local lastThreadId = redis.call('lindex', KEYS[2], -1);" + "local ttl;" + "if lastThreadId ~= false and lastThreadId ~= ARGV[2] then " + "ttl = tonumber(redis.call('zscore', KEYS[3], lastThreadId)) - tonumber(ARGV[4]);" + "else " + "ttl = redis.call('pttl', KEYS[1]);" + "end;" + "local timeout = ttl + tonumber(ARGV[3]) + tonumber(ARGV[4]);" + "if redis.call('zadd', KEYS[3], timeout, ARGV[2]) == 1 then " + "redis.call('rpush', KEYS[2], ARGV[2]);" + "end;" + "return ttl;"
联锁(MultiLock)
源码位置:org.redisson.RedissonMultiLock
联锁是对批量加锁的封装,其关键是如何实现死锁避免,其中的关键代码如下(org.redisson.RedissonMultiLock#tryLock(long waitTime, long leaseTime, TimeUnit unit)):
安装 Spring Boot CLI 默认安装最新版本的(安装位置在$HOME/.sdkman 下):
1
sdk install springboot
切换 Spring Boot CLI 版本
1 2 3
sdk list springboot sdk install springboot XXX.RELEASE sdk use springboot XXX.RELEASE
设置默认版本
1
sdk default springboot XXX.RELEASE
使用本地编译的 springboot
1 2 3
$ sdk install springboot dev /path/to/spring-boot/spring-boot-cli/target/spring-boot-cli-2.0.0.BUILD-SNAPSHOT-bin/spring-2.0.0.BUILD-SNAPSHOT/ $ sdk default springboot dev $ spring --version
正常情况下一个类加载器只能找到加载路径的 jar 包里当前目录或者文件类里面的 *.class 文件,SpringBoot 允许我们使用 java -jar archive.jar 运行包含嵌套依赖 jar 的 jar 或者 war 文件。
传统类加载器的局限
传统类加载器无法加载 jar 包中嵌套的 jar 包。比如项目打包后包含如下这些类和 jar 包,则 c.jar 中的类无法被加载:
1 2 3 4 5 6
a1.class a2.class b.jar b1.class b2.class c.jar
为了能够加载嵌套 jar 里面的资源,之前的做法都是把嵌套 jar 里面的 class 文件和应用的 class 文件打包为一个 jar,这样就不存在嵌套 jar 了,但是这样做就不能很清晰的知道哪些是应用自己的,哪些是应用依赖的,另外多个嵌套 jar 里面的 class 文件可能内容不一样但是文件名却一样时候又会引发新的问题。
加载嵌套 jar 包中的 class 文件
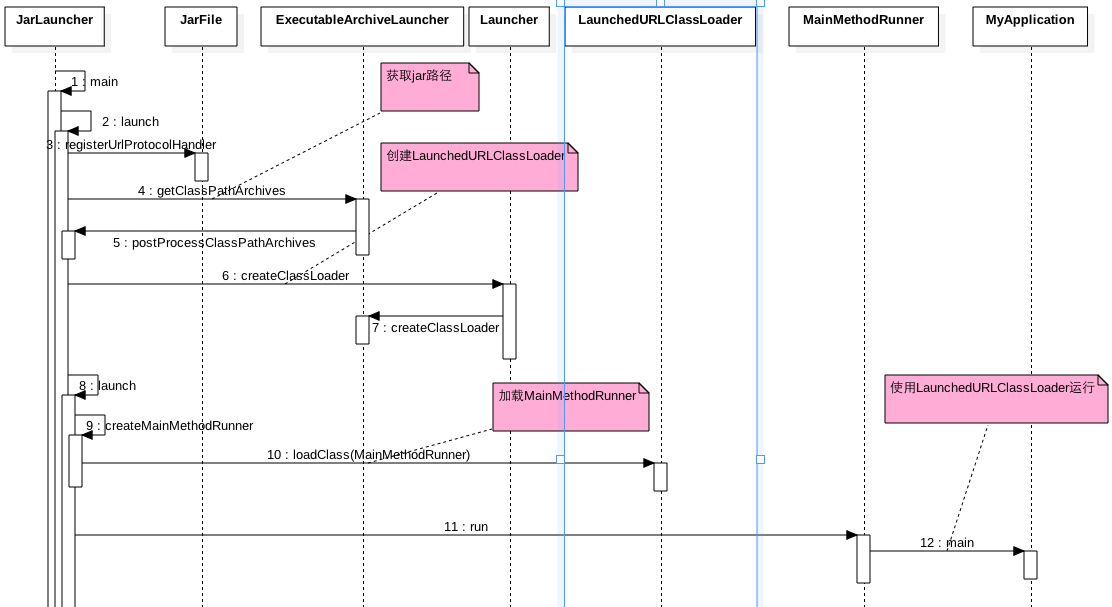
在 Java 中,AppClassLoader 和 ExtClassLoader 都继承自 URLClassLoader,并通过构造函数来传递需要加载的 class 文件所在的目录。 那么只要将 jar 包中嵌套的 jar 包所在的路径作为 URLClassLoader 的扫描路径,就可以实现对嵌套 jar 包的扫描了。 但是默认情况下 Java 使用 AppClassLoader 加载使用命令启动时指定的 classpath 下的类和 jar 包,那么如何使用自定义的 URLClassLoader 来加载这些类和 jar 包呢?具体做法是加一个中间层。 原来是直接使用 AppClassLoader 来加载应用:AppClassLoader -> Application。 现在先加载一个自定义的启动类 Launcher,其中自定义 URLClassLoader,再使用该 URLClassLoader 来加载我们真正的 main 函数:AppClassLoader -> Launcher -> URLClassLoader -> Application。
spring-boot-load 提供的启动器 Launcher
spring-boot-load 模块允许我们加载嵌套 jar 包中的 class 文件,它包含三种类启动器:
@Configuration @AutoConfigureOrder(Ordered.HIGHEST_PRECEDENCE) @ConditionalOnClass(ServletRequest.class) @ConditionalOnWebApplication(type = Type.SERVLET) @EnableConfigurationProperties(ServerProperties.class) @Import({ ServletWebServerFactoryAutoConfiguration.BeanPostProcessorsRegistrar.class, ServletWebServerFactoryConfiguration.EmbeddedTomcat.class, ServletWebServerFactoryConfiguration.EmbeddedJetty.class, ServletWebServerFactoryConfiguration.EmbeddedUndertow.class }) public class ServletWebServerFactoryAutoConfiguration {
@Bean public ServletWebServerFactoryCustomizer servletWebServerFactoryCustomizer(ServerProperties serverProperties) { return new ServletWebServerFactoryCustomizer(serverProperties); }
@Bean @ConditionalOnClass(name = "org.apache.catalina.startup.Tomcat") public TomcatServletWebServerFactoryCustomizer tomcatServletWebServerFactoryCustomizer( ServerProperties serverProperties) { return new TomcatServletWebServerFactoryCustomizer(serverProperties); }
/** * Registers a {@link WebServerFactoryCustomizerBeanPostProcessor}. Registered via * {@link ImportBeanDefinitionRegistrar} for early registration. */ public static class BeanPostProcessorsRegistrar implements ImportBeanDefinitionRegistrar, BeanFactoryAware {
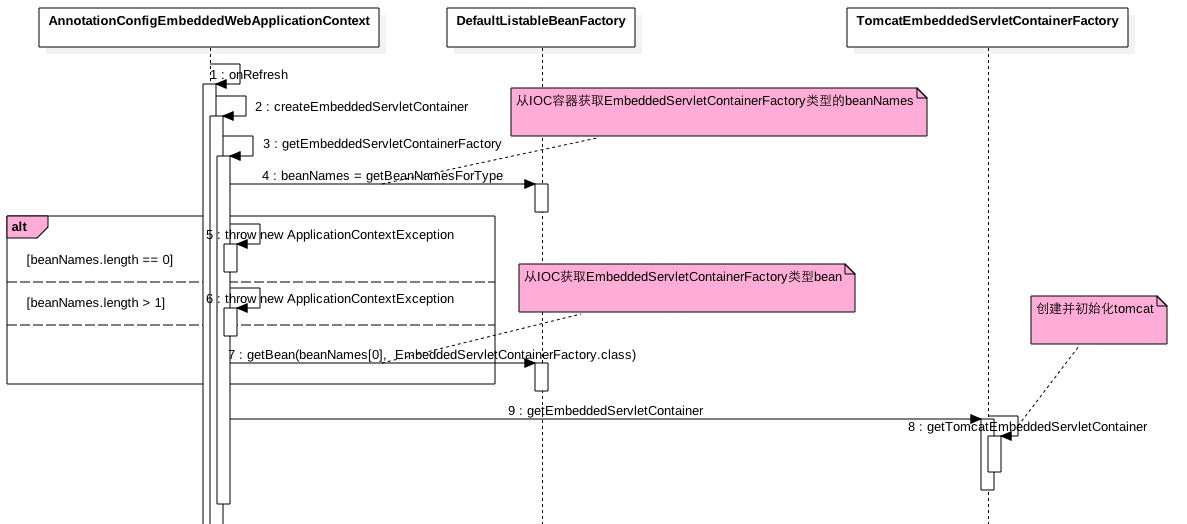
通过自动配置将 TomcatEmbeddedServletContainerFactory 或者 JettyEmbeddedServletContainerFactory 的实例注入 IOC 容器后,我们就可以使用 Web 容器来提供 Web 服务了。 具体的 Web 容器的创建是在容器刷新过程的 onRefresh 阶段进行的(这个阶段是在刷新过程的 invokeBeanFactoryPostProcessors 阶段的后面):
getBeanNamesForType 获取了 IOC 容器中的 EmbeddedServletContainerFactory 类型的 Bean 的 name 集合,如果 name 集合为空或者多个则抛出异常。还记得 Web 容器工厂是通过自动配置注入到 IOC 的吧,并且 TomcatEmbeddedServletContainerFactory 或者 JettyEmbeddedServletContainerFactory 都是实现了 EmbeddedServletContainerFactory 接口。
如果 IOC 里面只有一个 Web 容器工厂 Bean 则获取该 Bean 的实例,然后调用该 Bean 的 getEmbeddedServletContainer 获取 Web 容器,这里假设 Web 容器工厂为 Tomcat ,则创建 Tomcat 容器并进行初始化。
Actuator 模块
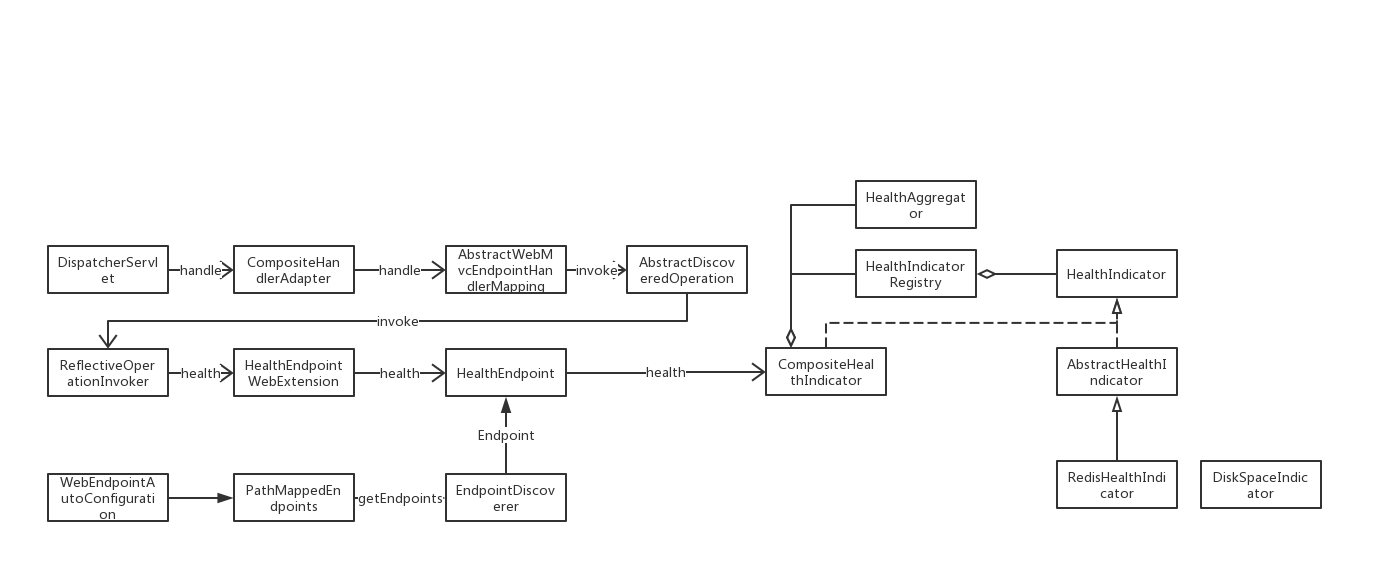
Actuator 模块提供了一些组件用于检查应用或中间件的健康状况:
Inspect:检测应用或中间件的健康状况;
Aggregate:聚合所有结果。
基于 Actuator 模块,我们可以开发一个服务探活系统:
Actuator 为业务服务器暴露出一个探活端口healthcheck,借助 Spring 容器获取到中间件的客户端实例;
private static final Logger LOG = Logger.getLogger(ZipkinTest2Application.class); @Autowired private RestTemplate restTemplate; @Bean public RestTemplate getRestTemplate() { return new RestTemplate(); }
@RequestMapping("/miya") public String miya() { LOG.log(Level.INFO, "info is being called"); return restTemplate.getForObject("http://localhost:8988/info", String.class); }
为 Service 注入 Sampler 用于记录 Span
1 2 3 4
@Bean public AlwaysSampler defaultSampler() { return new AlwaysSampler(); }
JVM 规范中定义了 class 文件的格式,但并未定义 Java 源码如何被编译为 class 文件,各厂商在实现 JDK 时通常会将符合 Java 语言规范的源码编译为 class 文件的编译器,例如在 Sun JDK 中就是 javac,javac 将 Java 源码编译为 class 文件的步骤如下图所示:
// The current thread already owns the monitor and it has not yet // been added to the wait queue so the current thread cannot be // made the successor. This means that the JVMTI_EVENT_MONITOR_WAIT // event handler cannot accidentally consume an unpark() meant for // the ParkEvent associated with this ObjectMonitor. } ObjectSynchronizer::wait(obj, ms, CHECK); JVM_END
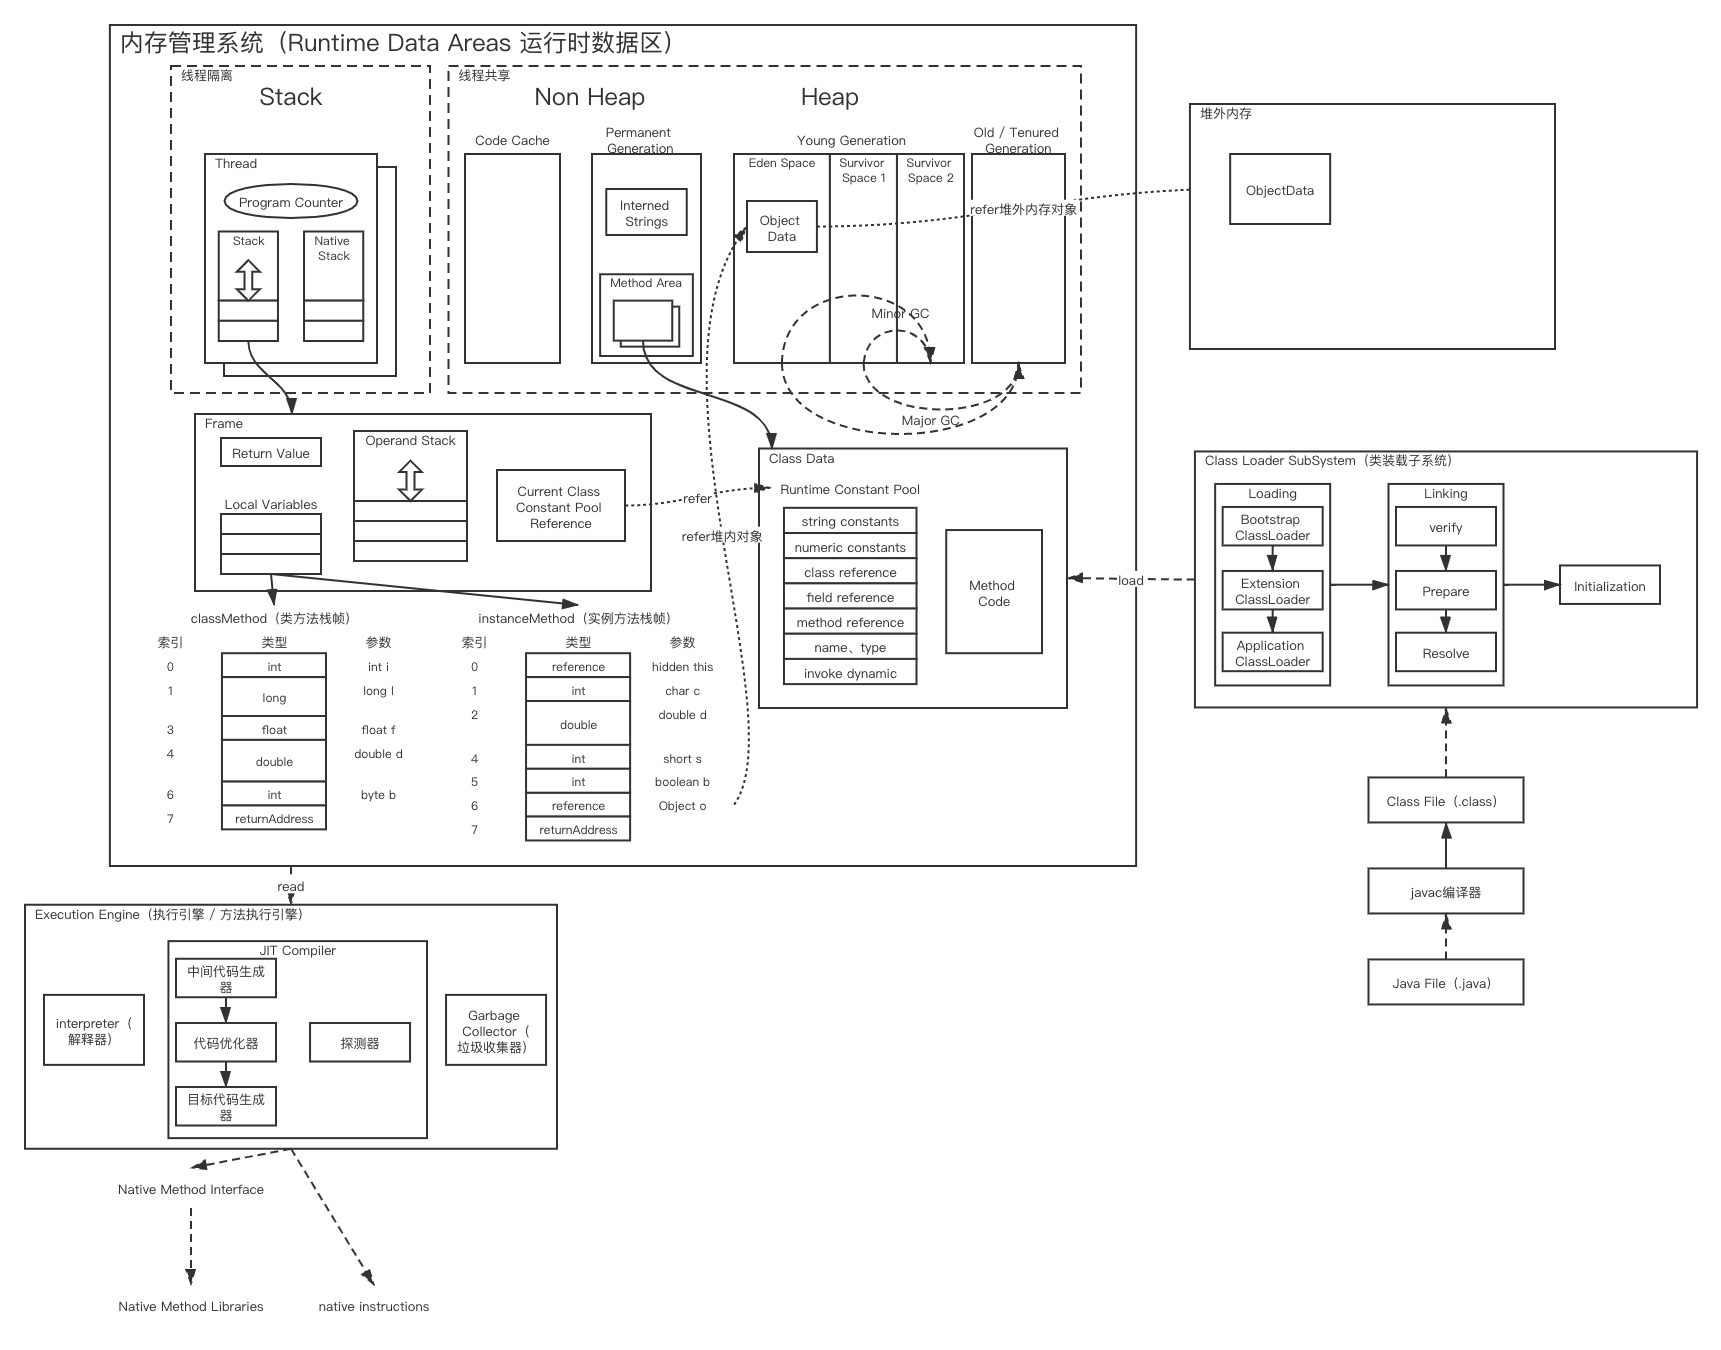
public class Example { // 类方法 public static int classMethod(int i, long l, float f, double d, Object o, byte b) { return 0; } // 实例方法 public int instanceMethod(char c, double d, short s, boolean b) { return 0; } }
类方法和实例方法栈帧结构有所不同,从图中可以看到它们之间的区别:
类方法帧里没有隐含的 this 引用,而实例方法帧中会隐含一个 this 引用;
并且注意:
byte,char,short,boolean 类型存入局部变量区的时候都会被转化成 int 类型值,当被存回堆或者方法区时,才会转化回原来的类型;
当一个方法执行完毕之后,要返回之前调用它的地方,因此在栈帧中必须保存一个方法返回地址。方法退出的过程实际上等同于把当前栈帧出栈,因此退出时可能执行的操作有:恢复上层方法的局部变量表和操作数栈,把返回值(如果有的话)压入调用都栈帧的操作数栈中,调用 PC 计数器的值以指向方法调用指令后面的一条指令等。
每个栈帧都包含一个指向运行时常量池中该栈帧所属方法的引用,持有这个引用是为了支持方法调用过程中的动态连接。在 Class 文件的常量池中存有大量的符号引用,字节码中的方法调用指令就以常量池中指向方法的符号引用为参数。这些符号引用一部分会在类加载阶段或第一次使用的时候转化为直接引用,这种转化称为静态解析。另外一部分将在每一次的运行期期间转化为直接引用,这部分称为动态连接。
public class GCLogTest { public static void main(String[] args) { int _1m = 1024 * 1024; byte[] data = new byte[_1m]; // 将data置null让其可被回收 data = null; System.gc(); } }
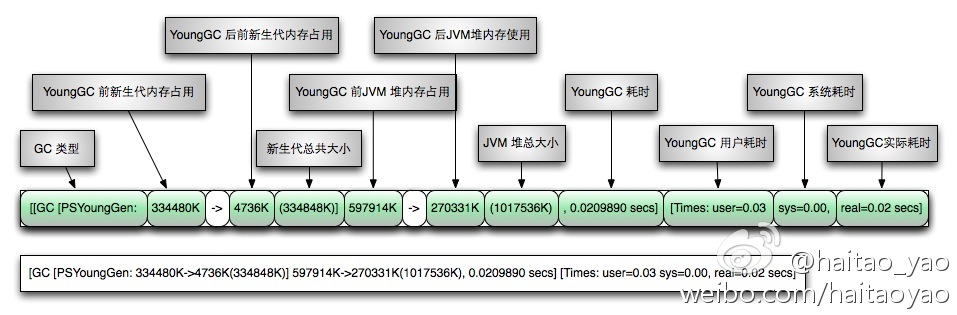
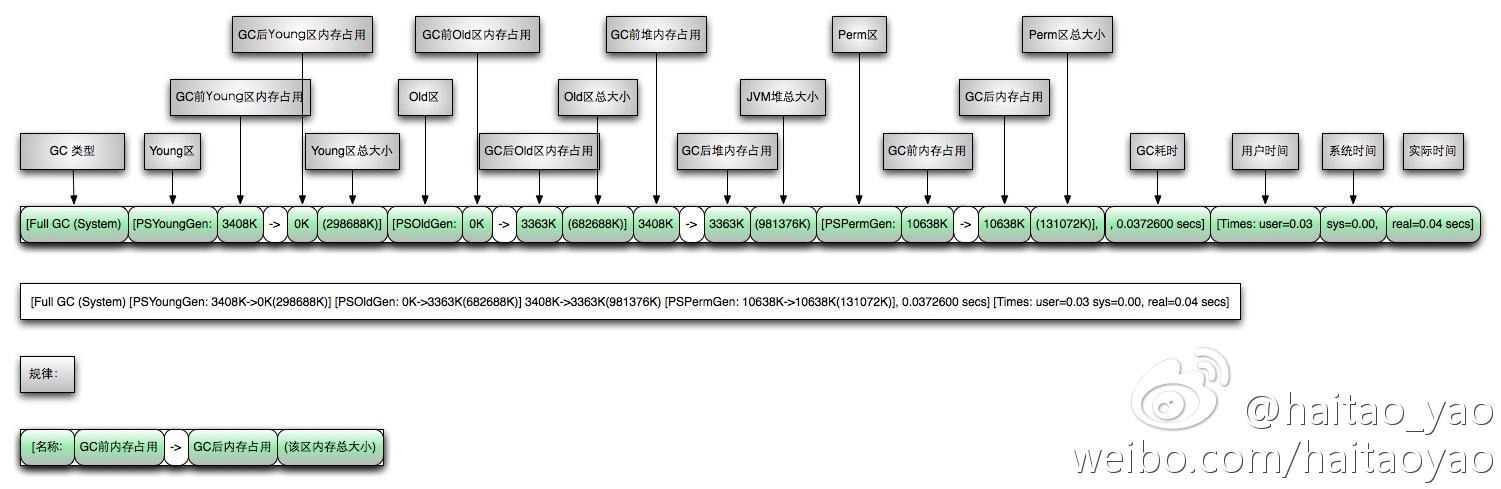
在 IDE 中设置 VM 参数-XX:+PrintGCDetails,再运行,可以得到:
1 2 3 4 5 6 7 8 9 10 11 12
[GC (System.gc()) [PSYoungGen: 5051K->776K(38400K)] 5051K->784K(125952K), 0.0014035 secs] [Times: user=0.01 sys=0.00, real=0.00 secs] [Full GC (System.gc()) Disconnected from the target VM, address: '127.0.0.1:55472', transport: 'socket' [PSYoungGen: 776K->0K(38400K)] [ParOldGen: 8K->684K(87552K)] 784K->684K(125952K), [Metaspace: 2980K->2980K(1056768K)], 0.0040080 secs] [Times: user=0.01 sys=0.00, real=0.00 secs] Heap PSYoungGen total 38400K, used 333K [0x0000000795580000, 0x0000000798000000, 0x00000007c0000000) eden space 33280K, 1% used [0x0000000795580000,0x00000007955d34a8,0x0000000797600000) from space 5120K, 0% used [0x0000000797600000,0x0000000797600000,0x0000000797b00000) to space 5120K, 0% used [0x0000000797b00000,0x0000000797b00000,0x0000000798000000) ParOldGen total 87552K, used 684K [0x0000000740000000, 0x0000000745580000, 0x0000000795580000) object space 87552K, 0% used [0x0000000740000000,0x00000007400ab0d0,0x0000000745580000) Metaspace used 2988K, capacity 4568K, committed 4864K, reserved 1056768K class space used 318K, capacity 392K, committed 512K, reserved 1048576K
java.lang.OutOfMemoryError: Java heap space 表示 Java 堆空间不足。当应用程序申请更多的内存时,若 Java 堆内存已经无法满足应用程序的需要,则将抛出这种异常。
1
2
3
4
5
6
7
8
9
10
11
12
13
/* VM Args: -Xms20m -Xmx20m -XX:+HeapDumpOnOutOfMemoryError */ public class HeapOOM { static class OOMObject {}
public static void main(String[] args) { List<OOMObject> list = new ArrayList<>(); while(true) { list.add(new OOMObject()); } } }
java.lang.OutOfMemoryError: PermGen space,表示 Java 永久代(方法区)的空间不足。永久代用于存放类的字节码和常量池,类的字节码被加载后存放在这个区域,这和存放对象实例的堆区是不同的。大多数 JVM 的实现都不会对永久代进行垃圾回收,因此,只要类加载过多就会出现这个问题。一般的应用程序都不会产生这个错误,然而,对于 Web 服务器会产生大量的 JSP,JSP 在运行时被动态地编译为 Java Servlet 类,然后加载到方法区,因此,有很多 JSP 的 Web 工程可能会产生这个异常。
1 2 3 4 5 6 7 8 9 10 11 12
/* VM Args: -XX:PermSize=10M -XX:MaxPermSize=10M */ public class RuntimeConstantPoolOOM { public static void main(String[] args) { // 使用List保持对常量池的引用,避免Full GC回收常量池 List<String> list = new ArrayList<String>(); for(int i = 0;; i++) { list.add(String.valueOf(i).intern()); } } }
使用 intern 测试运行时常量池是“永久代”的还是“元空间”的:
1 2 3 4
String str1 = new StringBuilder("计算机").append("软件").toString();
System.out.println(str1.intern() == str1);
String str2 = new StringBuilder("ja").append("va").toString();
System.out.println(str2.intern() == str2);
11179 "New I/O worker #168" #299 daemon prio=5 os_prio=0 tid=0x00007f3a75127000 nid=0x5cf runnable [0x00007f37278f7000]
11180    java.lang.Thread.State: RUNNABLE
11181     at sun.nio.ch.EPollArrayWrapper.epollWait(Native Method)
11182     at sun.nio.ch.EPollArrayWrapper.poll(EPollArrayWrapper.java:269)
11183     at sun.nio.ch.EPollSelectorImpl.doSelect(EPollSelectorImpl.java:79)
11184     at sun.nio.ch.SelectorImpl.lockAndDoSelect(SelectorImpl.java:86)
11185     - locked <0x00000000e4669320> (a sun.nio.ch.Util$2)
11186     - locked <0x00000000e4669310> (a java.util.Collections$UnmodifiableSet)
11187     - locked <0x00000000e46691e8> (a sun.nio.ch.EPollSelectorImpl)
11188     at sun.nio.ch.SelectorImpl.select(SelectorImpl.java:97)
11189     at org.jboss.netty.channel.socket.nio.SelectorUtil.select(SelectorUtil.java:68)
11190     at org.jboss.netty.channel.socket.nio.AbstractNioSelector.select(AbstractNioSelector.java:434)
11191     at org.jboss.netty.channel.socket.nio.AbstractNioSelector.run(AbstractNioSelector.java:212)
11192     at org.jboss.netty.channel.socket.nio.AbstractNioWorker.run(AbstractNioWorker.java:89)
11193     at org.jboss.netty.channel.socket.nio.NioWorker.run(NioWorker.java:178)
11194     at org.jboss.netty.util.ThreadRenamingRunnable.run(ThreadRenamingRunnable.java:108)
11195     at org.jboss.netty.util.internal.DeadLockProofWorker$1.run(DeadLockProofWorker.java:42)
11196     at java.util.concurrent.ThreadPoolExecutor.runWorker(ThreadPoolExecutor.java:1142)
11197     at java.util.concurrent.ThreadPoolExecutor$Worker.run(ThreadPoolExecutor.java:617)
11198     at java.lang.Thread.run(Thread.java:745)