@Service public class A { @Autowired private B b; } @Service public class B { @Autowired private A a; }
prototype 模式 field 属性注入循环依赖
1 2 3 4 5 6 7 8 9 10 11 12 13
@Scope(ConfigurableBeanFactory.SCOPE_PROTOTYPE)
@Service
public class A {
    @Autowired
    private B b;
}

@Scope(ConfigurableBeanFactory.SCOPE_PROTOTYPE)
@Service
public class B {
    @Autowired
    private A a;
}
# 假设当前目录下有a和b两个目录
mount -o bind a b # b成为a的硬链接,其实就是将a挂载到了b上
mount # 通过mount可以看出是bind这个参数起作用
/dev/sda2 on /home/hgc/Downloads/b type ext4 (rw,relatime,errors=remount-ro,data=ordered)
# 删除时必须先卸载再删除
umount b
rm -rf b
从操作系统概念上说,线程是最小的可执行单位,也就是系统调度的最小单位。进程是资源分配的最小单位。线程是依赖进程存在的,共享进程内的资源,如内存,cpu,io 等。在操作系统的发展过程中,为了提高系统的稳定性、吞吐量和安全性,操作系统内核和用户态做了隔离,例如 Linux 有内核线程,用户线程,内核进程,用户进程,从根本上 Linux 是没有线程的,线程对 Linux 系统来说是个特殊的进程。那么用户线程和内核线程是一一对应呢?从宏观上看是一一对应的,在用户态的每一个线程,都会在内核有对应的执行线程,但是由于资源的限制,用户态的线程和内核线程是多对一的关系。用户进程和内核进程也类似。具体怎样对应的,这里就不探讨了。 为了提高操作系统的实时性,操作系统是以时间片轮转来实现任务调度的。理论上时间片内是不可以被中断的,可认为是 cpu 最小的单位执行时间。现代操作系统为了提高用户体验,线程都是抢占式的,而中断一般在时间片用完的时候发生。线程、进程和 CPU 都是多对一的关系,所以存在进程线程切换的问题。 线程内部还是有自己内存空间的,所以有个概念叫线程内存模型。线程内部有自己私有的本地内存,故线程和线程之间的本地内存存在可见性问题。例如全局变量 A 在线程 1 修改后,线程 2 并不一定能拿到 A 的修改值,因为线程 1 会把全局变量 A 拷贝到本地内存,修改后并不会马上同步。在编译的时候,编译器为了优化,(例如利用超线程技术)可能会重排指令的执行顺序,这就会存在一致性了。
线程安全
在线程安全里面经常要讨论的两个问题就是:可见性和一致性。锁是什么东西呢?锁就是一道内存屏障,保证可见性和一致性的一种策略,由操作系统甚至更底层的硬件提供。加锁是消耗资源的,特别是在多核 CPU 上,现在多核 CPU 一般有 3 级缓存,一级缓存通常是单核独占的,而线程的本地内存很可能就保存在 cpu 的缓存里面,然而加锁就意味着保证可见性和一致性,需要中断同步数据,保证别人拿到的是最新修改值。由于用途不同,锁被设计成各种各样的,如互斥锁,读写锁,自旋锁,同步块,数据库的事务等,如果只要保证可见性的,可以不使用锁,在 java 里面可以使用 volatile 修饰全局变量。虽然在 c/c++,都有同样的修饰符,但是是不是一样的意思呢,请参考其他文章。
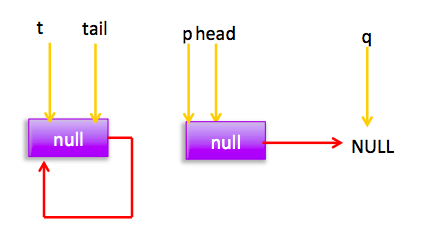
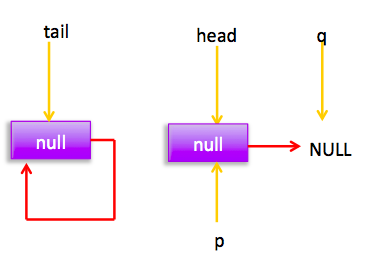
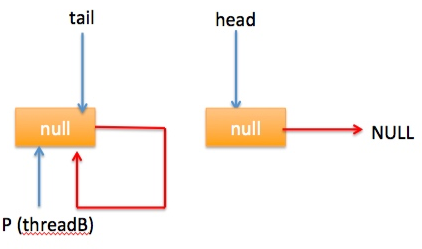
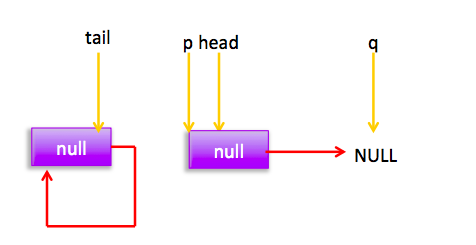
自引用的情况 假设线程A已经执行到(2)将第一个节点值置为null,这时又有一个线程B开始执行poll操作,如下图所示: 然后线程 A 执行 updateHead 操作,执行完毕后线程 A 退出,这时候队列状态为: 然后线程 B 继续执行代码(3)q=p.next由于该节点是自引用节点所以p==q所以会执行代码(4)跳到外层循环 restartFromHead,重新获取当前队列队头 head, 现在状态为:
public int size() {
    long n = sumCount();
    return ((n < 0L) ? 0 :
            (n > (long)Integer.MAX_VALUE) ? Integer.MAX_VALUE :
            (int)n);
}

final long sumCount() {
    CounterCell[] as = counterCells; CounterCell a;
    long sum = baseCount;
    if (as != null) {
        for (int i = 0; i < as.length; ++i) {
            if ((a = as[i]) != null)
                sum += a.value;
        }
    }
    return sum;
}
//(3)从尾节点进行插入
for (Node<E> t = tail, p = t;;) {

    Node<E> q = p.next;

    //(4)如果q==null说明p是尾节点,则执行插入
    if (q == null) {

        //(5)使用CAS设置p节点的next节点
        if (p.casNext(null, newNode)) {
            //(6)cas成功,则说明新增节点已经被放入链表,然后设置当前尾节点
            if (p != t)
                casTail(t, newNode);  // Failure is OK.
            return true;
        }
    }
    else if (p == q)//(7)
        //多线程操作时候,由于poll操作移除元素后有可能会把head变为自引用,然后head的next变为新head,所以这里需要
        //重新找新的head,因为新的head后面的节点才是正常的节点。
        p = (t != (t = tail)) ? t : head;
    else
        //(8) 寻找尾节点
        p = (p != t && t != (t = tail)) ? t : q;
}
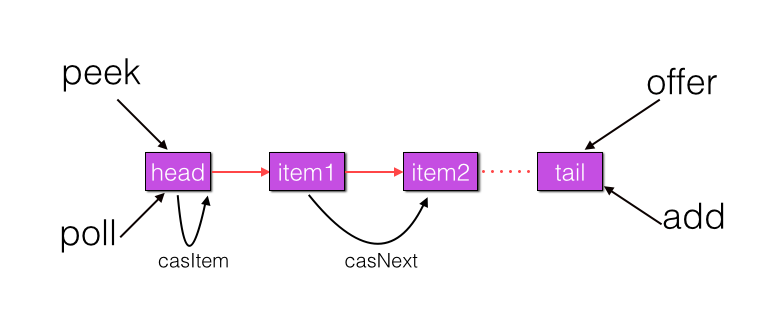
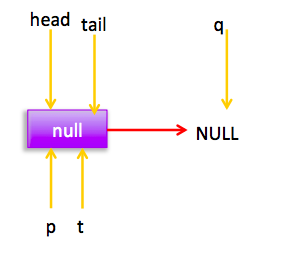
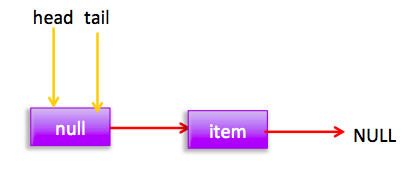
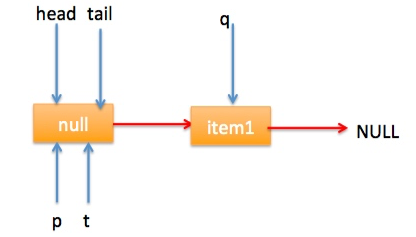
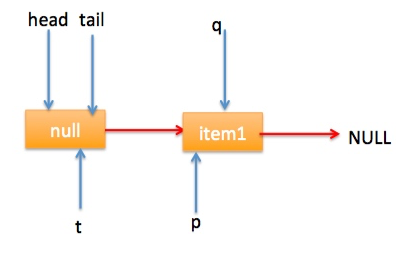
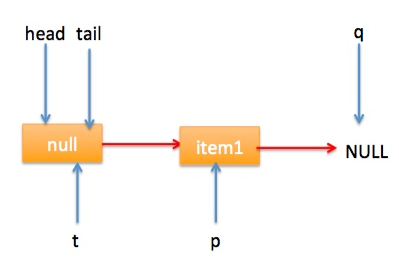
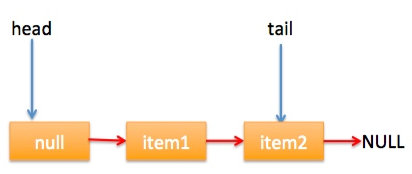
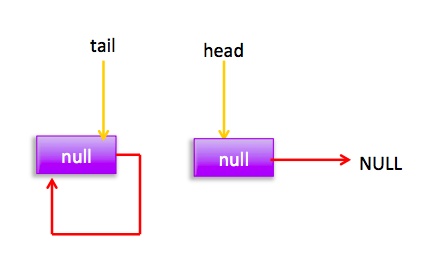
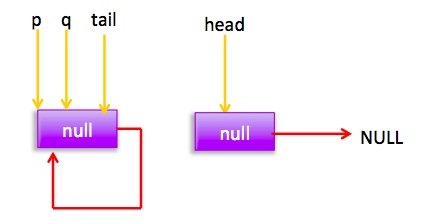
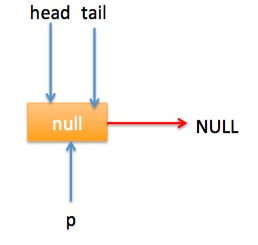
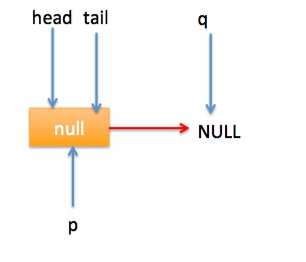
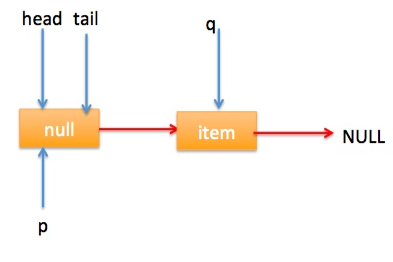
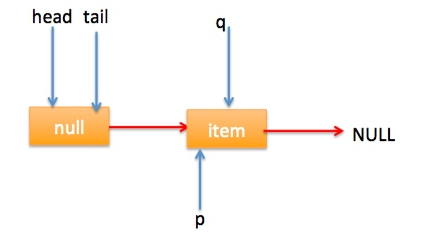
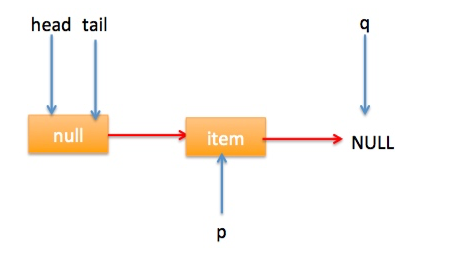
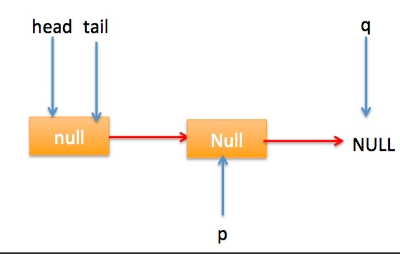
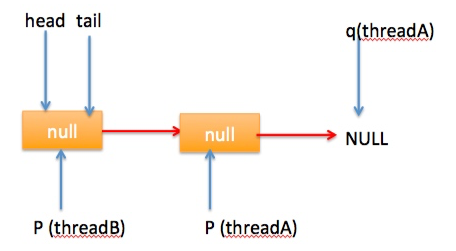
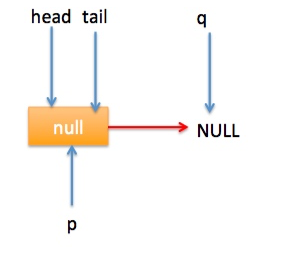
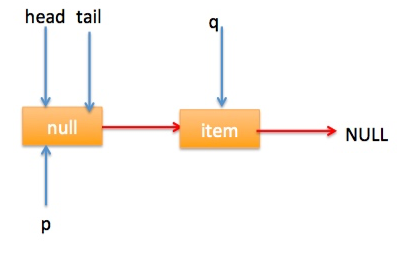
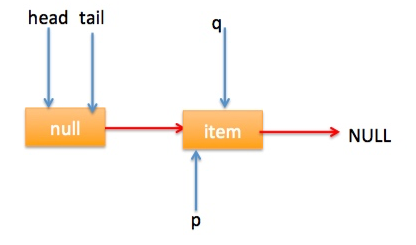
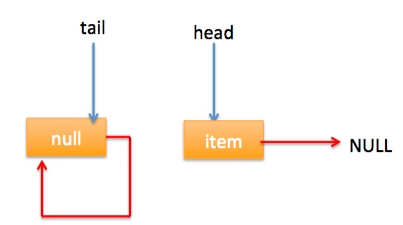
} 上节类图结构时候谈到构造队列时候参构造函数创建了一个 item 为 null 的哨兵节点,并且 head 和 tail 都是指向这个节点,下面通过图形结合来讲解下 offer 操作的代码实现。 首先看下当一个线程调用 offer(item)时候情况:首先代码(1)对传参判断空检查,如果为 null 则抛出 NPE 异常,然后代码(2)则使用 item 作为构造函数参数创建了一个新的节点,代码(3)从队列尾部节点开始循环,意图是从队列尾部添加元素。 上图是执行代码(4)时候队列的情况,这时候节点 p,t,head,tail 同时指向了 item 为 null 的哨兵节点,由于哨兵节点的 next 节点为 null, 所以这里 q 指向也是 null。 代码(4)发现q==null则执行代码(5)通过 CAS 原子操作判断 p 节点的 next 节点是否为 null,如果为 null 则使用节点 newNode 替换 p 的 next 节点,然后执行代码(6)由于p==t所以没有设置尾部节点,然后退出 offer 方法,这时候队列的状态图如下: 上面讲解的是一个线程调用 offer 方法的情况,如果多个线程同时调用,就会存在多个线程同时执行到代码(5),假设线程 A 调用 offer(item1), 线程 B 调用 offer(item2), 线程 A 和 B 同时执行到 p.casNext(null, newNode)。而 CAS 的比较并设置操作是原子性的,假设线程 A 先执行了比较设置操作则发现当前 p 的 next 节点确实是 null 则会原子性更新 next 节点为 newNode,这时候线程 B 也会判断 p 的 next 节点是否为 null,结果发现不是 null(因为线程 A 已经设置了 p 的 next 为 newNode)则会跳到步骤(3),然后执行到步骤(4)时候队列分布图为: 根据这个状态图可知线程 B 会去执行代码(8),然后 q 赋值给了 p,这时候队列状态图为: 然后线程 B 再次跳转到代码(3)执行,当执行到代码(4)时候队列状态图为: 由于这时候 q==null, 所以线程 B 会执行步骤(5),通过 CAS 操作判断当前 p 的 next 节点是否是 null,不是则再次循环后尝试,是则使用 newNode 替换,假设 CAS 成功了,那么执行步骤(6)由于 p!=t 所以设置 tail 节点为 newNode,然后退出 offer 方法。这时候队列分布图为: 分析到现在,offer 代码的执行路径现在就差步骤(7)还没走过,其实这个要在执行 poll 操作后才会出现,这里先看下执行 poll 操作后可能会存在的的一种情况如下图: 下面分析下当队列处于这种状态时候调用 offer 添加元素代码执行到步骤(4)时候的状态图: 由于 q 节点不为空并且p==q所以执行步骤(7),由于t==tail所以 p 被赋值为了 head,然后进入循环,循环后执行到代码(4)时候队列状态为: 由于q==null, 所以执行步骤(5)进行 CAS 操作,如果当前没有其他线程执行 offer 操作,则 CAS 操作会成功,p 的 next 节点被设置为新增节点,然后执行步骤(6),由于p!=t所以设置新节点为队列为节点,现在队列状态如下: 这里自引用的节点会被垃圾回收掉。 总结:可见 offer 操作里面关键步骤是代码(5)通过原子 CAS 操作来进行控制同时只有一个线程可以追加元素到队列末尾,进行 cas 竞争失败的线程则会通过循环一次次尝试进行 cas 操作,直到 cas 成功才会返回,也就是通过使用无限循环里面不断进行 CAS 尝试方式来替代阻塞算法挂起调用线程,相比阻塞算法这是使用 CPU 资源换取阻塞所带来的开销。 2.2.2 poll 操作 poll 操作是在队列头部获取并且移除一个元素,如果队列为空则返回 null,下面看看实现原理。 public E poll() { //(1) goto标记 restartFromHead:
//(2)无限循环
for (;;) {
    for (Node<E> h = head, p = h, q;;) {

        //(3)保存当前节点值
        E item = p.item;

        //(4)当前节点有值则cas变为null
        if (item != null && p.casItem(item, null)) {
            //(5)cas成功标志当前节点以及从链表中移除
            if (p != h)
                updateHead(h, ((q = p.next) != null) ? q : p);
            return item;
        }
        //(6)当前队列为空则返回null
        else if ((q = p.next) == null) {
            updateHead(h, p);
            return null;
        }
        //(7)自引用了,则重新找新的队列头节点
        else if (p == q)
            continue restartFromHead;
        else//(8)
            p = q;
    }
}
} final void updateHead(Node h, Node p) { if (h != p && casHead(h, p)) h.lazySetNext(h); } 同理本节也通过图形结合的方式来讲解代码执行逻辑: poll 操作是从队头获取元素,所以代码(2)内层循环是从 head 节点开始迭代,代码(3)获取当前队头的节点,当队列一开始为空时候队列状态为: 由于 head 节点指向的为 item 为 null 的哨兵节点,所以会执行到代码(6),假设这个过程中没有线程调用 offer 方法,则此时 q 等于 null 如下图: 所以执行 updateHead 方法,由于 h 等于 p 所以没有设置头结点,poll 方法直接返回 null。 假设执行到代码(6)时候已经有其它线程调用了 offer 方法成功添加一个元素到队列,这时候 q 指向的是新增元素的节点,这时候队列状态为: 所以代码(6)判断结果为 false,然后会转向代码(7)执行,而此时 p 不等于 q,所以转向代码(8)执行,执行结果是 p 指向了节点 q,此时队列状态为: 然后程序转向代码(3)执行,p 现在指向的元素值不为 null,则执行p.casItem(item, null) 通过 CAS 操作尝试设置 p 的 item 值为 null,如果此时没有其它线程进行 poll 操作,CAS 成功则执行代码(5)由于此时 p!=h 所以设置头结点为 p,poll 然后返回被从队列移除的节点值 item。此时队列状态为: 这个状态就是讲解 offer 操作时候,offer 代码的执行路径(7)执行的前提状态。 假如现在一个线程调用了 poll 操作,则在执行代码(4) 时候队列状态为: 可知这时候执行代码(6)返回 null. 现在 poll 的代码还有个分支(7)没有执行过,那么什么时候会执行那?下面来看看,假设线程 A 执行 poll 操作时候当前队列状态为: 那么执行p.casItem(item, null) 通过 CAS 操作尝试设置 p 的 item 值为 null。 假设 CAS 设置成功则标示该节点从队列中移除了,此时队列状态为: 然后由于 p!=h, 所以会执行 updateHead 方法,假如线程 A 执行 updateHead 前另外一个线程 B 开始 poll 操作这时候线程 B 的 p 指向 head 节点,但是还没有执行到代码(6)这时候队列状态为: 然后线程 A 执行 updateHead 操作,执行完毕后线程 A 退出,这时候队列状态为: 然后线程 B 继续执行代码(6)q=p.next由于该节点是自引用节点所以p==q所以会执行代码(7)跳到外层循环 restartFromHead,重新获取当前队列队头 head, 现在状态为: 总结:poll 方法移除一个元素时候只是简单的使用 CAS 操作把当前节点的 item 值设置 null,然后通过重新设置头结点让该元素从队列里面摘除,被摘除的节点就成了孤立节点,这个节点会被在垃圾回收的时候会回收掉。另外执行分支中如果发现头节点被修改了要跳到外层循环重新获取新的头节点。 2.2.3 peek 操作 peek 操作是获取队列头部一个元素(只不获取不移除),如果队列为空则返回 null,下面看看实现原理。 public E peek() { //(1) restartFromHead: for (;;) { for (Node h = head, p = h, q;;) { //(2) E item = p.item; //(3) if (item != null || (q = p.next) == null) { updateHead(h, p); return item; } //(4) else if (p == q) continue restartFromHead; else //(5) p = q; } } } 代码结构与 poll 操作类似,不同在于步骤(3)的使用只是少了 castItem 操作,其实这很正常,因为 peek 只是获取队列头元素值并不清空其值,根据前面我们知道第一次执行 offer 后 head 指向的是哨兵节点(也就是 item 为 null 的节点),那么第一次 peek 时候代码(3)中会发现 item==null, 然后会执行 q = p.next, 这时候 q 节点指向的才是队列里面第一个真正的元素或者如果队列为 null 则 q 指向 null。 当队列为空时候这时候队列状态为: 这时候执行 updateHead 由于 h 节点等于 p 节点所以不进行任何操作,然后 peek 操作会返回 null。 当队列至少有一个元素时候(这里假设只有一个)这时候队列状态为: 这时候执行代码(5)这时候 p 指向了 q 节点,然后执行代码(3)这时候队列状态为: 执行代码(3)发现 item 不为 null,则执行 updateHead 方法,由于 h!=p, 所以设置头结点,设置后队列状态为: 也就是剔除了哨兵节点。 总结:peek 操作代码与 poll 操作类似只是前者只获取队列头元素但是并不从队列里面删除,而后者获取后需要从队列里面删除,另外在第一次调用 peek 操作时候,会删除哨兵节点,并让队列的 head 节点指向队列里面第一个元素或者 null。 2.2.4 size 操作 获取当前队列元素个数,在并发环境下不是很有用,因为 CAS 没有加锁所以从调用 size 函数到返回结果期间有可能增删元素,导致统计的元素个数不精确。 public int size() { int count = 0; for (Node p = first(); p != null; p = succ(p)) if (p.item != null) // 最大返回Integer.MAX_VALUE if (++count == Integer.MAX_VALUE) break; return count; }
//获取第一个队列元素(哨兵元素不算),没有则为null Node first() { restartFromHead: for (;;) { for (Node h = head, p = h, q;;) { boolean hasItem = (p.item != null); if (hasItem || (q = p.next) == null) { updateHead(h, p); return hasItem ? p : null; } else if (p == q) continue restartFromHead; else p = q; } } }
//获取当前节点的next元素,如果是自引入节点则返回真正头节点 final Node succ(Node p) { Node next = p.next; return (p == next) ? head : next; } 2.2.5 remove 操作 如果队列里面存在该元素则删除给元素,如果存在多个则删除第一个,并返回 true,否者返回 false public boolean remove(Object o) {
//查找元素为空,直接返回false
if (o == null) return false;
Node<E> pred = null;
for (Node<E> p = first(); p != null; p = succ(p)) {
    E item = p.item;

    //相等则使用cas值null,同时一个线程成功,失败的线程循环查找队列中其它元素是否有匹配的。
    if (item != null &&
        o.equals(item) &&
        p.casItem(item, null)) {

        //获取next元素
        Node<E> next = succ(p);

        //如果有前驱节点,并且next不为空则链接前驱节点到next,
        if (pred != null && next != null)
            pred.casNext(p, next);
        return true;
    }
    pred = p;
}
return false;
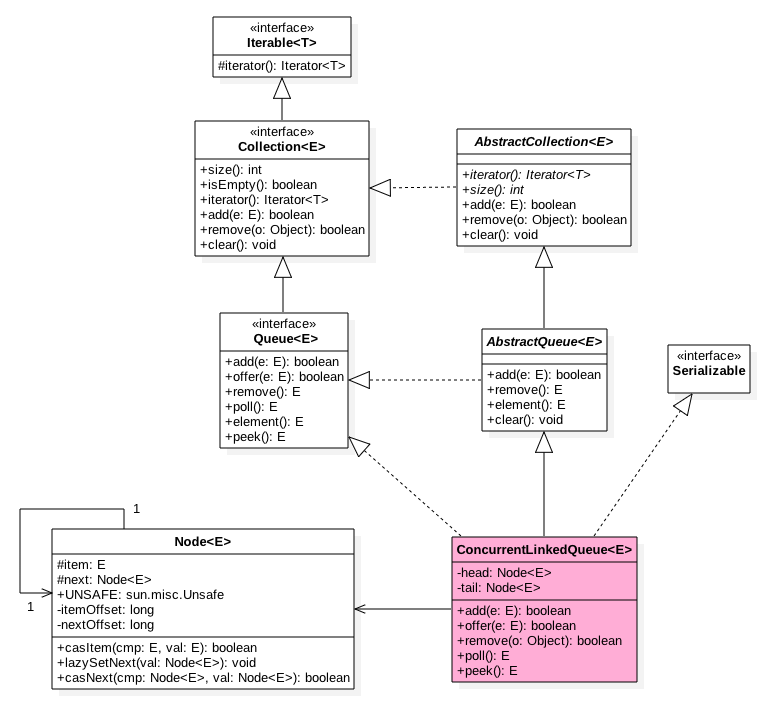
} 注:ConcurrentLinkedQueue 底层使用单向链表数据结构来保存队列元素,每个元素被包装为了一个 Node 节点,队列是靠头尾节点来维护的,创建队列时候头尾节点指向一个 item 为 null 的哨兵节点,第一次 peek 或者 first 时候会把 head 指向第一个真正的队列元素。由于使用非阻塞 CAS 算法,没有加锁,所以获取 size 的时候有可能进行了 offer,poll 或者 remove 操作,导致获取的元素个数不精确,所以在并发情况下 size 函数不是很有用。
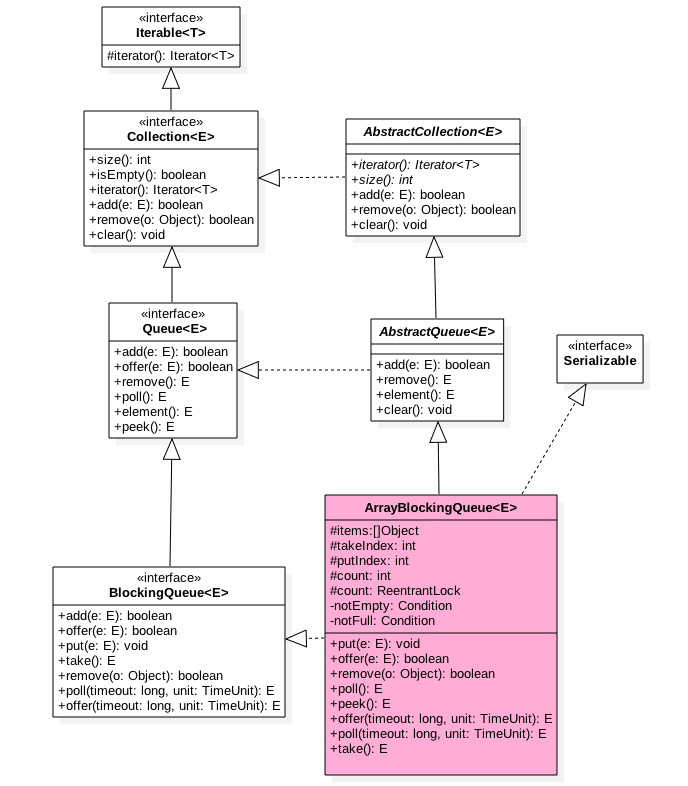
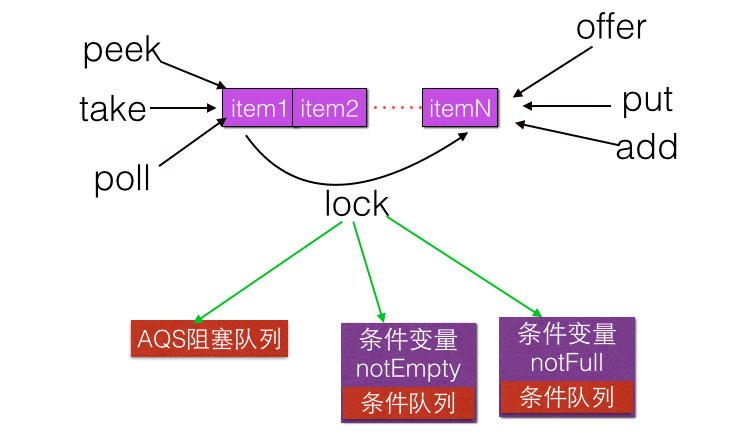
/** 当队列为空时候执行出队操作(比如take)的线程会被放入这个条件队列进行等待 */
private final Condition notEmpty = takeLock.newCondition();

/** 执行put, offer等操作时候需要获取该锁*/
private final ReentrantLock putLock = new ReentrantLock();

/**当队列满时候执行进队操作(比如put)的线程会被放入这个条件队列进行等待 */
private final Condition notFull = putLock.newCondition();
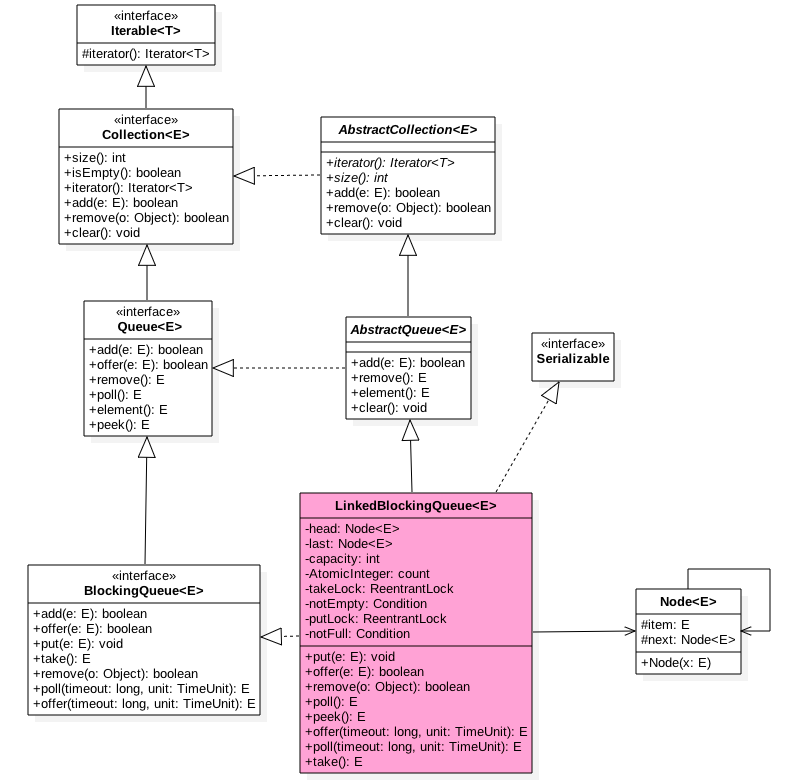
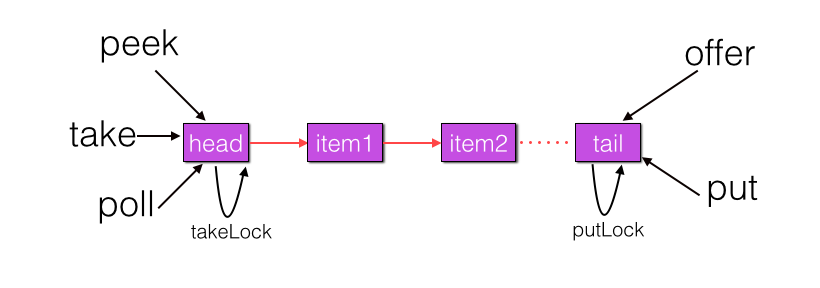
/** 当前队列元素个数 */ private final AtomicInteger count = new AtomicInteger(0); 如下是 LinkedBlockingQueue 无参构造函数代码: public static final int MAX_VALUE = 0x7fffffff;
public LinkedBlockingQueue() { this(Integer.MAX_VALUE); }
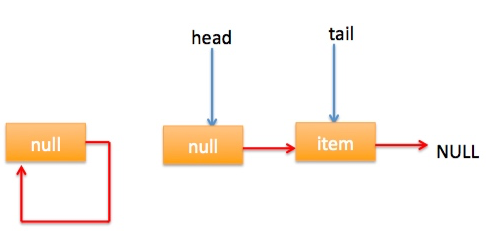
public LinkedBlockingQueue(int capacity) { if (capacity <= 0) throw new IllegalArgumentException(); this.capacity = capacity; //初始化首尾节点,指向哨兵节点 last = head = new Node(null); } 从代码可知默认队列容量为 0x7fffffff; 用户也可以自己指定容量,所以一定程度上 LinkedBlockingQueue 可以说是有界阻塞队列。 首先使用一个图来概况该队列,读者在读完本节后在回头体会下: 3.2 LinkedBlockingQueue 原理介绍 3.2.1 offer 操作 向队列尾部插入一个元素,如果队列有空闲容量则插入成功后返回 true,如果队列已满则丢弃当前元素然后返回 false,如果 e 元素为 null 则抛出 NullPointerException 异常,另外该方法是非阻塞的。 public boolean offer(E e) {
    //(1)空元素抛空指针异常
    if (e == null) throw new NullPointerException();

    //(2) 如果当前队列满了则丢弃将要放入的元素,然后返回false
    final AtomicInteger count = this.count;
    if (count.get() == capacity)
        return false;

    //(3) 构造新节点,获取putLock独占锁
    int c = -1;
    Node<E> node = new Node<E>(e);
    final ReentrantLock putLock = this.putLock;
    putLock.lock();
    try {
        //(4)如果队列不满则进队列,并递增元素计数
        if (count.get() < capacity) {
            enqueue(node);
            c = count.getAndIncrement();
            //(5)
            if (c + 1 < capacity)
                notFull.signal();
        }
    } finally {
        //(6)释放锁
        putLock.unlock();
    }
    //(7)
    if (c == 0)
        signalNotEmpty();
    //(8)
    return c >= 0;
}
private void enqueue(Node node) { last = last.next = node; } 步骤(2)判断如果当前队列已满则丢弃当前元素并返回 false 步骤(3)获取到 putLock 锁,当前线程获取到该锁后,则其它调用 put 和 offer 的线程将会被阻塞(阻塞的线程被放到 putLock 锁的 AQS 阻塞队列)。 步骤(4)这里有重新判断了下当前队列是否满了,这是因为在执行代码(2)和获取到 putLock 锁期间可能其它线程通过 put 或者 offer 方法向队列里面添加了新元素。重新判断队列确实不满则新元素入队,并递增计数器。 步骤(5)判断如果新元素入队后队列还有空闲空间,则唤醒 notFull 的条件队列里面因为调用了 notFull 的 await 操作(比如执行 put 方法而队列满了的时候)而被阻塞的一个线程,因为队列现在有空闲所以这里可以提前唤醒一个入队线程。 代码(6) 则释放获取的 putLock 锁,这里要注意锁的释放一定要在 finally 里面做,因为即使 try 块抛异常了,finally 也是会被执行到的。另外释放锁后其它因为调用 put 和 offer 而被阻塞的线程将会有一个获取到该锁。 代码(7)c==0 说明在执行代码(6)释放锁时候队列里面至少有一个元素,队列里面有元素则执行 signalNotEmpty,下面看看 signalNotEmpty 的代码: private void signalNotEmpty() { final ReentrantLock takeLock = this.takeLock; takeLock.lock(); try { notEmpty.signal(); } finally { takeLock.unlock(); } } 可知作用是激活 notEmpty 的条件队列中因为调用 notEmpty 的 await 方法(比如调用 take 方法并且队列为空的时候)而被阻塞的一个线程,这里也说明了调用条件变量的方法前要首先获取对应的锁。 综上可知 offer 方法中通过使用 putLock 锁保证了在队尾新增元素的原子性和队列元素个数的比较和递增操作的原子性。 3.2.2 put 操作 向队列尾部插入一个元素,如果队列有空闲则插入后直接返回 true,如果队列已满则阻塞当前线程直到队列有空闲插入成功后返回 true,如果在阻塞的时候被其它线程设置了中断标志,则被阻塞线程会抛出 InterruptedException 异常而返回,另外如果 e 元素为 null 则抛出 NullPointerException 异常。 put 操作的代码结构与 offer 操作类似,代码如下: public void put(E e) throws InterruptedException { //(1)空元素抛空指针异常 if (e == null) throw new NullPointerException(); //(2) 构建新节点,并获取独占锁putLock int c = -1; Node node = new Node(e); final ReentrantLock putLock = this.putLock; final AtomicInteger count = this.count; putLock.lockInterruptibly(); try { //(3)如果队列满则等待 while (count.get() == capacity) { notFull.await(); } //(4)进队列并递增计数 enqueue(node); c = count.getAndIncrement(); //(5) if (c + 1 < capacity) notFull.signal(); } finally { //(6) putLock.unlock(); } //(7) if (c == 0) signalNotEmpty(); } 代码(2)中使用 putLock.lockInterruptibly() 获取独占锁,相比 offer 方法中这个获取独占锁方法意味着可以被中断,具体说是当前线程在获取锁的过程中,如果被其它线程设置了中断标志则当前线程会抛出 InterruptedException 异常,所以 put 操作在获取锁过程中是可被中断的。 代码(3)如果当前队列已满,则调用 notFull 的 await() 把当前线程放入 notFull 的条件队列,当前线程被阻塞挂起并释放获取到的 putLock 锁,由于 putLock 锁被释放了,所以现在其它线程就有机会获取到 putLock 锁了。 另外考虑下代码(3)判断队列是否为空为何使用 while 循环而不是 if 语句那?其实是考虑到当前线程被虚假唤醒的问题,也就是其它线程没有调用 notFull 的 singal 方法时候 notFull.await() 在某种情况下会自动返回。如果使用 if 语句那么虚假唤醒后会执行代码(4)元素入队,并且递增计数器,而这时候队列已经是满了的,导致队列元素个数大于了队列设置的容量,导致程序出错。而使用 while 循环假如 notFull.await() 被虚假唤醒了,那么循环在检查一下当前队列是否是满的,如果是则再次进行等待。 3.2.3 poll 操作 从队列头部获取并移除一个元素,如果队列为空则返回 null,该方法是不阻塞的。 public E poll() { //(1)队列为空则返回null final AtomicInteger count = this.count; if (count.get() == 0) return null; //(2)获取独占锁 E x = null; int c = -1; final ReentrantLock takeLock = this.takeLock; takeLock.lock(); try { //(3)队列不空则出队并递减计数 if (count.get() > 0) {//3.1 x = dequeue();//3.2 c = count.getAndDecrement();//3.3 //(4) if (c > 1) notEmpty.signal(); } } finally { //(5) takeLock.unlock(); } //(6) if (c == capacity) signalNotFull(); //(7)返回 return x; } private E dequeue() { Node h = head; Node first = h.next; h.next = h; // help GC head = first; E x = first.item; first.item = null; return x; } 代码 (1) 如果当前队列为空,则直接返回 null 代码(2)获取独占锁 takeLock,当前线程获取该锁后,其它线程在调用 poll 或者 take 方法会被阻塞挂起 代码 (3) 如果当前队列不为空则进行出队操作,然后递减计数器。 代码(4)如果 c>1 则说明当前线程移除掉队列里面的一个元素后队列不为空(c 是删除元素前队列元素个数),那么这时候就可以激活因为调用 poll 或者 take 方法而被阻塞到 notEmpty 的条件队列里面的一个线程。 代码(6)说明当前线程移除队头元素前当前队列是满的,移除队头元素后队列当前至少有一个空闲位置,那么这时候就可以调用 signalNotFull 激活因为调用 put 或者 offer 而被阻塞放到 notFull 的条件队列里的一个线程,signalNotFull 的代码如下: private void signalNotFull() { final ReentrantLock putLock = this.putLock; putLock.lock(); try { notFull.signal(); } finally { putLock.unlock(); } } poll 代码逻辑比较简单,值得注意的是获取元素时候只操作了队列的头节点。 3.2.4 peek 操作 获取队列头部元素但是不从队列里面移除,如果队列为空则返回 null,该方法是不阻塞的。 public E peek() { //(1) if (count.get() == 0) return null; //(2) final ReentrantLock takeLock = this.takeLock; takeLock.lock(); try { Node first = head.next; //(3) if (first == null) return null; else //(4) return first.item; } finally { //(5) takeLock.unlock(); } } peek 操作代码也比较简单,这里需要注意的是代码(3)这里还是需要判断下 first 是否为 null 的,不能直接执行代码(4)。正常情况下执行到代码(2)说明队列不为空,但是代码(1)和(2)不是原子性操作,也就是在执行点(1)判断队列不空后,在代码(2)获取到锁前有可能其它线程执行了 poll 或者 take 操作导致队列变为了空,然后当前线程获取锁后,直接执行 first.item 会抛出空指针异常。 3.2.5 take 操作 获取当前队列头部元素并从队列里面移除,如果队列为空则阻塞调用线程。如果队列为空则阻塞当前线程直到队列不为空然后返回元素,如果在阻塞的时候被其它线程设置了中断标志,则被阻塞线程会抛出 InterruptedException 异常而返回。 public E take() throws InterruptedException { E x; int c = -1; final AtomicInteger count = this.count; //(1)获取锁 final ReentrantLock takeLock = this.takeLock; takeLock.lockInterruptibly(); try { //(2)当前队列为空则阻塞挂起 while (count.get() == 0) { notEmpty.await(); } //(3)出队并递减计数 x = dequeue(); c = count.getAndDecrement(); //(4) if (c > 1) notEmpty.signal(); } finally { //(5) takeLock.unlock(); } //(6) if (c == capacity) signalNotFull(); //(7) return x; } 代码(1)当前线程获取到独占锁,其它调用 take 或者 poll 的线程将会被阻塞挂起。 代码(2)如果队列为空则阻塞挂起当前线程,并把当前线程放入 notEmpty 的条件队列。 代码(3)进行出队操作并递减计数。 代码(4)如果 c>1 说明当前队列不为空,则唤醒 notEmpty 的条件队列的条件队列里面的一个因为调用 take 或者 poll 而被阻塞的线程。 代码(5)释放锁。 代码(6)如果 c == capacity 则说明当前队列至少有一个空闲位置,则激活条件变量 notFull 的条件队列里面的一个因为调用 put 或者 offer 而被阻塞的线程。 3.2.6 remove 操作 删除队列里面指定元素,有则删除返回 true,没有则返回 false public boolean remove(Object o) { if (o == null) return false;
//(1)双重加锁
fullyLock();
try {

    //(2)遍历队列找则删除返回true
    for (Node<E> trail = head, p = trail.next;
         p != null;
         trail = p, p = p.next) {
         //(3)
        if (o.equals(p.item)) {
            unlink(p, trail);
            return true;
        }
    }
    //(4)找不到返回false
    return false;
} finally {
    //(5)解锁
    fullyUnlock();
}
private Result doInvoke(List<Invoker<T>> invokers, final List<Invoker<T>> invoked, Holder<RpcException> lastException, final Set<String> providers, final Invocation invocation, final LoadBalance loadbalance, final int totalRetries, int retries, Holder<Invoker<T>> lastInvoked) throws RpcException { if (retries < totalRetries) { checkWheatherDestoried(); invokers = list(invocation); checkInvokers(invokers, invocation); }
public ConsistentHashSelector(List<Invoker<T>> invokers, String methodName, int identityHashCode) {
    this.virtualInvokers = new TreeMap<Long, Invoker<T>>();
    this.identityHashCode = identityHashCode;
    URL url = invokers.get(0).getUrl();

    String[] index = Constants.COMMA_SPLIT_PATTERN.split(url.getMethodParameter(methodName, "hash.arguments", "0"));
    argumentIndex = new int[index.length];
    for (int i = 0; i < index.length; i++) {
        argumentIndex[i] = Integer.parseInt(index[i]);
    }

    int replicaNumber = url.getMethodParameter(methodName, "hash.nodes", 160);
    for (Invoker<T> invoker : invokers) {
        String address = invoker.getUrl().getAddress();
        // 多复制几个,更均匀,避免所有请求都被hash到同一个Invoker
        for (int i = 0; i < replicaNumber / 4; i++) {
            byte[] digest = md5(address + i);
            for (int h = 0; h < 4; h++) {
                long m = hash(digest, h);
                // 放入圆环上
                virtualInvokers.put(m, invoker);
            }
        }
    }
}
public static void main(String[] args) { ClassPathXmlApplicationContext context = new ClassPathXmlApplicationContext( new String[]{"classpath:consumer.xml"});
final UserServiceBo demoService = (UserServiceBo) context.getBean("userService");
Dubbo 是一个分布式服务框架,是阿里巴巴 SOA 服务化治理方案的核心框架,致力于提供高性能和透明化的 RPC 远程服务调用方案,以及 SOA 服务治理方案。简而言之,Dubbo 是个远程服务调用的分布式框架(告别 Web Service 模式中的 WSdl,以服务提供者与消费者的方式在 dubbo 上注册)。
通过版本号,也可以实现消费者和提供者服务端直接连接,因为发起调用默认使用随机调用端负载均衡模式,当有多台提供者的时候,会随机选取,通常联调阶段都会调用指定服务进行联调,直连一般用在调试,开发阶段,只需要消费者和提供者 version 相同即可。
灰度发布
有三台服务器 A、B、C 要上线,现在三台服务器都是旧版本代码,那首先从 Ngnix 负载均衡列表里移除 A 服务器的配置,切断对 A 的访问,然后在 A 服务器不受新的代码,重新把 A 配置进 Ngnix 负载均衡列表。如果在线使用没有问题,则继续升级 B、C 服务器,否则回滚,恢复旧版本代码,这是针对三端(PC 端,微信端,移动端)跟网关系统的。 如果是针对子系统,譬如用户系统、订单系统等,可以通过分组 group 来实现子系统的灰度发布。服务提供者有两组,One、Two,将新版本代码 group 改为 Two,旧版本 group 还是 One,将新版本的消费者 group 改为 Two,这时请求定位到新的消费者再调用新的提供者,而且旧的消费者还是请求旧的提供者,如果线上没有问题,那就把提供者 group 为 One 的组改为 Two,并部署新代码,旧的消费者也改成 Two 并部署新代码如果有问题,那消费端和提供端都回滚到旧版本。
异步调用
Dubbo 默认情况下是同步调用的,就是调用后立刻返回,但如果消费端调用服务端创建文件并转化成 PDF 格式的文件这种在 IO 密集操作时,消费端同步调用需要等待对方转换结束才返回,很消耗性能,这时选择异步调用和回调调用更合适。