基于微服务的资金云系统发债管理子系统总结
参考
1.Tony. 企业融资渠道有哪些?[EB/OL], https://www.zhihu.com/question/23939018
/answer/29132581, 2015.5.
2.周梅. ERP 实施中存在的问题及解决方案[J]. 中国集体经济,2013,28: 35-36.
3.于洪涛. SAP 坚定云转型之路[EB/OL], http://www.cnbp.net/news/detail/13618, 2016.9.
4.James Lewis , Martin Fowler . Microservices a definition of this new architectural term
[EB/OL], https://martinfowler.com/articles/microservices.html, 2014.3.
5.IT168 企业级. 年终盘点篇:2017 年度微服务调查报告出炉[EB/OL],
http://www.sohu.com/a/216277536_374240, 2018.1.
6.Henry Robinson. What Is CAP Theorem?[EB/OL], https://www.quora.com/What-
Is-CAP-Theorem-1, 2010.9.
7. Dan Pritchett. BASE: An Acid Alternative[J]. ACM Queue, 2008, 6(3):48-55.
- 保证分布式系统数据一致性的 6 种方案
- 阮一峰. 理解 RESTful 架构[EB/OL], http://www.ruanyifeng.com/blog/2011/09
/restful.html, 2011.9. - 程立. 大规模 SOA 系统中的分布事务处理[EB/OL], http://tsingxu.github.io
/blog/20140513/distributed-transaction-in-soa-by-chengli.pdf, 2008.12.
15.Hunt P, Konar M, Junqueira F P. ZooKeeper: Wait-free Coordination for Internet-scale
Systems[C]. Usenix Annual Technical Conference. 2010:653–710.
16.Zachary Tong, Clinton Gormley. Elasticsearch 权威指南[M]. O’Reilly Media, Inc,
2015, 27-35.
17.Baron.Scbwartz. 高性能 MySQL[M]. 北京:电子工业出版社, 2013.5, 1-33.
18.Redis Documentation[EB/OL], https://redis.io/documentation, 2018.3.
背景
项目意义

这个项目的业务部分的原型是司库云,但是重点不在业务,因此这里仅仅简单介绍一下。平时我们接触的最多的应该是共享单车、在线聊天、支付宝这种 To C 业务,To B 业务主要是由企业提出的,和个人不同,一个企业总是会有部门、上下级等关系,因此 To B 业务与 To C 业务的主要区别有以下几条:
- 层次化的权限管理
一般的企业中员工之间都会有上下级的关系,企业又会有集团、组织这些组成部分; - 无处不在的审批
企业中大部门场景都需要审批,以前是拿着单子到处跑,现在会将单子录到一些 APP 中,方便很多; - 更大的体量
一般企业会进行更大额的交易,我们平时将几万存入支付宝中对大型企业来说都是一点零头,对这么大额的操作,安全是优先于效率的(企业内部其实也只有百来号人会去用这样的系统)。
近年,似乎所有传统企业都在试图往互联网靠拢,上次听一位朋友讲到某机关部门布了一个集群供“大数据处理”(上千条级别),再如某企业开发云服务软件,测试时专门有一项“大数据用例”(上万条级别)。
将业务上云后,正如之前很多人困惑的那样:不就是把代码放到云主机上跑吗?但问题的关键不是技术新老,而是为什么要迁移到云端,主要是当下业务变更迅速、弹性大,使用传统的机房部署服务,应用实例能使用的硬件资源是固定的,如果数据量超过了机器可处理的范围,要么换一台更高档的机器,要么将整个实例复制到另一台机器上,再在网关处做负载均衡,当然这两种方式都有些缺陷。因此,技术的变革都是被逼出来的,当下云原生应用能够提供弹性扩展、资源预警等功能,且有更人性化的操作界面,取代传统的运维方式也是必然的。微服务是当下实现应用上云的首选架构风格,有丰富的资源(当然最重要的是比较火),这个小项目也是我对微服务的初步探究。
微服务
架构、架构风格、系统架构
架构风格关注的是如何使用一些连接件来组合软件组件,在 Web 应用中,我们会使用覆盖网络来描述软件的架构,连接件可以是 HTTP 协议、数据库连接器等,在桌面应用中,连接器可以是读取用户输入的管道,等等。
系统架构关注的是软件组件是如何实例化的,比如要几台服务器、哪些组件要复制等。
平时说的架构一般指的是架构风格,但对实现细节的深究是成为架构师的必经之路。
单体式、SOA 和微服务

图中,小圆形、方形、三角这些小图形是服务实例,包围小图形的双层方形是 Docker 容器实例,立方体是物理服务器(一般是云提供商提供的虚拟机实例)
传统的单体式应用(monolithic)在实践中往往存在着诸多问题,比如,在达到一定的复杂度后,不仅部署效率会降低,由开发不小心引入的任何 Bug 都会弄垮整个服务,且模块之间高度耦合,添加新功能的代价变得更高,由此也对测试带来了更大的压力。
微服务架构模式有点像SOA,他们都由多个服务构成,因此对 SOA 缺陷的讨论可以参照下面对微服务的讨论。但是,从另一个角度看,微服务架构模式是一个不包含 Web 服务(WS-)和 ESB 服务的 SOA,微服务应用乐于采用简单轻量级协议,比如 REST,而不是 WS-,在微服务内部避免使用 ESB 以及 ESB 类似功能,微服务架构模式也拒绝使用 canonical schema 等 SOA 概念,因此可以认为微服务是轻量版的 SOA。简而言之,它们之间的主要区别是对服务的治理方式不同。
微服务的概念由来已久,2011 年 5 月在威尼斯附近举办的软件架构师研讨会提出了“微服务”这个概念,Adrian Cockcroft 将其描述为一种“细粒度的 SOA”。
在国内,加快互联网+步伐成为许多传统企业的必然选择。业务场景、用户习惯和行为在迅速变化,许多传统行业线上业务出现急速增长。每个月都要进行业务系统更新的企业比例超过了半数,比如金融行业的移动支付、互联网理财等,汽车制造行业的营销、电商、售后服务等线上业务比例迅速提高。IT 团队业务开发、迭代都以每月、甚至每周来计,需要 7*24 小时响应,这些给系统开发和运维带来极大挑战。在服务的复杂化、线上访问压力大、交付速度无法满足业务需求等现状的前提下,寻求架构上的转型正是大势所趋。
微服务相对以传统方式部署的应用来说,具有易扩展、访问便捷、安全、性价比高等特点,将传统的单体式应用进行拆分后成为一个个微服务后,每一个微服务都可以单独进行部署,可以根据企业用户的具体需求提供服务,另外服务之间的弱耦合性也使得扩展变得更加容易。
总而言之,微服务应用相对单体式应用的优势体现在下面这些方面:
- 可扩展性高
严格界定服务边界,服务之间是弱耦合的,每个服务本身是无状态的,可以通过水平复制和负载均衡来提高服务性能。 - 实施效率高
应用 Docker 实现运维自动化,且每个服务都足够小,使得部署效率不会太低。 - 健壮
某个服务的不可用不会引起大规模雪崩,而且服务的复制也提高了整体的可用性。 - 单个服务复杂性低
每个服务都足够简单,由一个独立团队来负责。
开发、实施和运维
开发和运维在传统情况下是完全分割开来的,开发主要负责完成功能需求,并且知道如何去优化功能,运维要明白如何部署应用服务集群、中间件集群外,同时对所使用的工具的原理要有一定程度的了解,比如某个服务器的 CPU 打满了,原因可能是代码写得太差了,也可能是数据库某张热表没有给字段加上索引。现在 DevOps 的概念盛行,开发有时也需要承担环境的维护。
实施,说简单的,就是帮用户装软件的,该人员必须对软件整体具有较好的理解,因为实施会直面用户,如果被用户问倒可不只是丢自己一个人的脸,当然,一定程度的口才也是必要的。实施在 ERP 时代是很重要的一个职位,在当下云服务盛行的情况,实施往往会被派去为用户部署私有云环境(前提是有这个必要)。
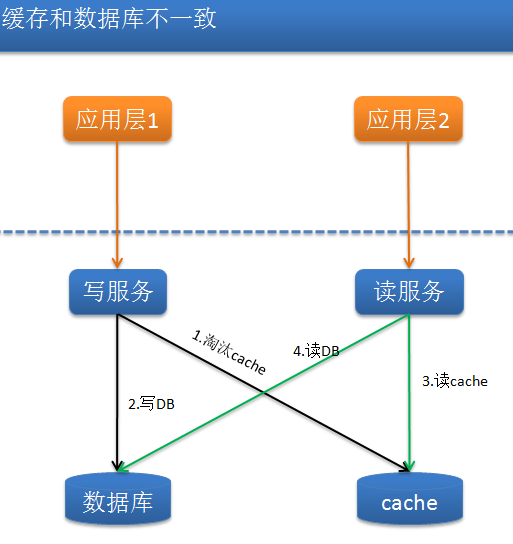
有状态和无状态服务
提到无状态我们都会想到 HTTP,HTTP 协议是一种无状态的协议,这意味着 HTTP 服务器不会保存任何用户信息,实现登录、购物车等带状态的功能时都需要额外借助 Session、分布式缓存、数据库等存储方案。以购物车为例,其中 Session 相当于将购物车的状态保存到了服务实例的内存中,而分布式缓存和数据库方案则将状态转移到了另一个服务器内(假设应用和缓存、数据库服务器是部署在不同的服务器上的)。
如果一个服务是有状态的,随着实例的运行,服务实例在内存中可能会多出一些与业务相关的数据,实例间产生差异后,我们后续就不能随意地对服务进行复制了,两次 HTTP 的可能会产生不同的结果,如下图所示。
因此有必要在设计的时候就保证服务是无状态的。
CAP & BASE
CAP是描述分布式系统特性常用的一种理论,它使用数据一致性(Consistency)、服务可用性(Availability)和分区容错性(Partition-tolerance)三个指标来定义一个分布式系统,这三个特性不能被同时完全满足,其中,P 是必须要满足的,因为一般的业务系统并不允许网络中的消息被随意丢弃,因此多数的讨论都集中于 C 和 A 之间的权衡。
如果需要满足强一致性,则在对数据进行读写操作时势必都需要进行加锁操作并使用事务来保证分布式一致性,但同时也会对系统的效率产生非常大的影响,起到反作用、影响用户的体验,所以在设计时往往会放宽这个要求,采取最终一致性作为实现目标。服务的高可用性要求请求必须能够完成,这可以通过复制服务实例来实现,服务实例的复制需要投入更多地成本与维护人力,需要根据具体场景进行具体分析。
eBay 的架构师 Dan Pritchett 源于对大规模分布式系统的实践总结,提出了 BASE 理论。BASE理论是对 CAP 理论的延伸,核心思想是即使无法做到 CAP 理论要求的强一致性,但应用可以采用适当的方式达到最终一致性(Eventual Consitency)。BASE 是指基本可用(Basically Available)、软状态(Soft State)和最终一致性(Eventual Consistency)。基本可用是指分布式系统在出现故障的时候,允许损失部分可用性,即保证核心可用。软状态是指允许系统存在中间状态,而该中间状态不会影响系统整体可用性。最终一致性是指系统中的所有数据副本经过一定时间后,最终能够达到一致的状态。
在 BASE 的提出者 Dan Pritchett 的论文《BASE: An Acid Alternative》中提出了一种实现 BASE 的经典模式,概括来讲,就是服务之间是通过消息队列连接的,消息队列会保证将消息传递给目标服务,但不保证送到的时间。
技术总结
接下来,我希望对项目中使用到的一些技术进行简短总结,尽量引入一些代码和图来辅助说明。
REST & RPC
REST 是现今一套比较成熟的 API 设计理论,主要思想是将网络上的资源抽象为 URI,并通过 HTTP 协议中的字段和动词进行描述和操作,被广泛地应用于 WEB 应用 API 的设计当中。
RPC 是常见的实现服务之间远程调用的协议(在 Java 这种面向对象的语言上实现的理应称作 RMI 协议,但是叫习惯了就无所谓了),服务实例作为不同的进程运行于多台服务器上,在发起请求时,请求的发起方称为客户端、接收者称为服务端,它们通过指定的网络层甚至传输层协议进行通信,可以自动对消息进行序列化并包装为底层消息格式进行传输,并在服务端进行反序列化得到请求。因此 RPC 的可靠性和效率与底层协议本身的效率和对对象进行的序列化和反序列化的效率息息相关。
调用 RPC 接口与调用本地方法形式上是相同的,这大大减少了代码的冗余、提升了开发效率,但是 RPC 本质上与普通方法调用却有着截然不同的执行流程,因此必须与普通方法区分开来、不能滥用。在设计微服务时,也必须考虑服务划分的粒度,如果分得过细就有可能导致一次请求需要过多的网络开销。
分布式锁、乐观锁与分布式事务
单机环境下,资源竞争者都是来自机器内部的进程或线程,那么实现锁的方案只需要借助单机资源就可以了,比如借助磁盘、内存、寄存器来实现。而在分布式环境下,资源竞争者生存环境更复杂了,原有依赖单机的方案不再发挥作用,这时候就需要一个大家都认可的协调者出来,帮助解决竞争问题,那这个协调者称之为分布式锁。
通过在执行修改操作前加分布式锁,可以很好地保证临界区资源的互斥访问,一定程度上维护了数据的一致性,但是在客户端进行读写的复合操作时加锁又是不充分的,因为读和写操作之间存在一定的时间差,如果在这期间数据被其他线程所修改,那么接下来的写操作就会覆盖这个修改,导致业务层面上的不一致,解决办法是引入乐观锁,本文的乐观锁是通过为实体类添加版本号来实现的,每次进行修改操作时需要比较对象与数据库中记录的版本,只有大于的情况才能执行。
微服务系统中的多个服务往往拥有自己独立部署的数据库,在跨服务对数据进行写操作时若发生错误就有可能产生数据不一致的情况,利用单纯的加锁机制是不能保证安全性的。分布式事务是指会涉及到操作多个数据库的事务,目的是为了保证系统中各服务能保持数据一致性。分布式事务处理的关键是必须有一种方法可以知道事务的所有参与者的动作,事务最终必须统一提交或统一回滚。文中采取的解决办法是引入 TCC 分布式事务,将业务操作划分为 try、confirm、cancel 三个部分,try 负责对业务资源的锁定,confirm 负责提交事务、正式执行业务操作,cancel 负责回滚事务并释放锁定的资源,在业务流程中执行所有的 try 完毕后,由协调者根据事务的执行情况来统一调用所有事务参与者的 confirm 提交或 cancel 回滚。TCC 在本地事务的基础上进行多个实例间的协调,可以在很大程度上保证跨服务业务操作的一致性。
Spring Cloud
Spring Cloud为开发人员提供了快速构建分布式系统中一些常见模式的工具,例如配置管理,服务发现,断路器,智能路由,微代理,控制总线等。
Spring Boot
Sping Cloud 的实现基础是Spring Boot,在构建项目前需要先引入所需基础设施的依赖。
比如若需要使用 ZooKeeper 的服务发现功能,只需要在 Maven 的 pom.xml 文件中添加名为”spring-cloud-starter-zookeeper-discovery”的依赖。
1 | <dependency> |
并在属性文件中指定 ZooKeeper 服务器的地址,就可以在应用中通过注入 DiscoveryClient 来使用 ZooKeeper 的服务发现功能了。
1 | @Autowired |
其他的功能也可以依法炮制。从某种意义上来说,Spring Cloud 更像是通过 Spring Boot 自动配置机制实现的由众多独立子项目组成的大型综合项目。
Spring Boot 的主要目标是解决传统 Spring 项目中配置文件过于繁杂的问题,随着业务的复杂度增加,配置变得越来越难维护且无法定制,因此 Spring Boot 的提出者利用注解和属性文件来取代配置文件,因为注解是与代码紧紧相依的,代码中可以直接通过注解来获取到属性文件中的属性,并按用户的需求来执行 Bean 的初始化过程,从而实现配置的高度可定制化。Spring Boot 的关键特性是自动配置,实现自动配置的方式是在应用启动后从 Spring Boot 提供的包内获取配置好的 Bean,并对常用的配置设定默认值,比如其内置的 Tomcat 服务器的默认占用端口即为 8080,并且支持在属性文件中修改,这在很大程度上减少了配置项的数量,同时也降低了运维人员的压力。
Dubbo
Spring Cloud 和 Dubbo 区别?为什么不使用 Dubbo???
Docker
Docker 执行流程?为什么用它来部署环境?
Docker 是一个基于容器的应用开发、部署和运行平台,它为开发者和系统管理员们提供了一种新式的应用部署方式,具有灵活、轻量、可移植等特点。传统的部署云服务的方式是通过虚拟机完成的,虚拟机会在宿主机上运行一个完整的操作系统、通过 hypervisor 来间接使用宿主机的硬件资源,实际上这远远超出了应用运行所必须的资源要求。而容器正相反,它在操作系统中作为进程运行,与所有其他容器共享同一内核、占用相同容量的内存空间,相对来说会更加轻量。
MySQL
MySQL 是一种常用的开源数据库,MySQL 软件采用了双授权政策,分社区版和商业版,具有体积小、速度快、总体拥有成本低、开放源码等特点。
Redis
Redis 有哪些数据结构?
Redis 是一个开源的使用 ANSI C 语言编写、支持网络、支持持久化的日志型、Key-Value 数据库,并提供多种语言的 API。
Nginx
Nginx 执行流程?反向代理解释一下?为什么使用 Nginx 作为静态页面服务器?负载均衡原理是什么?
Nginx 是一款高性能的 HTTP 和反向代理服务器软件,具有高性能、高并发、低 CPU 内存消耗的特点,功能包括反向代理、负载均衡、访问控制等,且可以根据需要自定义扩展组件。
ZooKeeper
ZooKeeper 执行流程?服务发现原理是什么?分布式锁原理是什么?
ZooKeeper 是一个分布式的开放源码的分布式应用程序协调服务,可以为分布式应用提供一致性服务,提供的功能包括:配置维护、域名服务、分布式同步、组服务等。
ZooKeeper 将资源抽象为文件系统,使用节点来表示数据在该文件系统中保存的路径。为了实现服务发现机制,每个实例在加入应用服务时会在 ZooKeeper 服务的同一命名空间下创建临时节点,并在退出时由 ZooKeeper 自动删除,这样任一个实例都可以通过查询该命名空间下来获得微服务集群内服务的注册情况。ZooKeeper 本身不提供锁服务,但是可以使用节点来表示锁,如果一个客户端需要为一个资源上锁,就可以为该资源所代表的路径下创建一个顺序节点,按照节点创建的顺序进行标号,客户端监听该路径下的节点,如果自己创建的节点标号是最小的就获取到锁,当释放锁时需要删除自己创建的节点,这样基本实现了客户端之间的互斥访问。
RabbitMQ
RabbitMQ 执行流程?消息队列的数据结构是怎样的?
RabbitMQ 是一个在 AMQP 基础上完成的、可复用的企业消息系统。AMQP 协议定义了消息队列需要具有的面向消息、队列、路由(包括点对点和发布/订阅)、可靠性、安全性等特点。RabbitMQ 是一个开源的 AMQP 实现,服务器端用 Erlang 语言编写,支持包括 Java 在内的多种客户端,主要应用于在分布式系统中存储转发消息,在易用性、扩展性、高可用性等方面表现不俗。
Elasticsearch
Elasticsearch 执行流程?文档数据结构是怎样的?
Elasticsearch 是一个分布式、可扩展、实时的搜索与数据分析引擎。擅长全文搜索、结构化数据的实时统计、复杂的语言处理等。并且原生支持分布式部署,可以通过管理多节点来提高扩容性和可用性,并在硬件故障时确保数据安全。
架构设计与实现
整体架构
微服务的首要任务是对模块进行拆分,整个系统的主要模块如下图所示。
需要实现的主要功能包括:
- 使用权限模块来实现权限分配、功能隔离、租户隔离;
- 用户能够利用该系统进行发债放款、审批、结算等;
- 用户能获得预警信息;
- 系统内需要使用服务发现机制来实现服务的弹性伸缩。
每个模块成为一个独立的服务,它们具有明确清晰的功能边界,且相互之间只暴露必要的远程接口,形成类似下图的结构。
部分功能的实现涉及到一些中间件,更详细的架构图如下图所示。
其中:
- 主要功能模块拥有独立的数据库,它们是独立部署的;
- 服务发现服务用于自动实现服务的上下线,使用 ZooKeeper 服务器作为服务注册中心,服务发现服务会将注册在 ZooKeeper 服务器上的服务信息更新到 Nginx 服务器上;
- Docker 提供容器形式的运行环境,使用 Docker Swarm 管理容器集群,服务和中间件运行在容器实例内,称为服务实例,多个服务实例组成一个服务;
- Nginx 有两个作用:
- 作为静态文件服务器。前端使用 React 开发,通过运行
npm run build编译成为静态文件,将产生的整个文件夹移动到 Nginx 的静态文件目录下; - 负载均衡。Nginx 是一个反向代理服务器,调用任何服务的 REST 接口需要先经过 Nginx 进行转发,Nginx 在同一服务的各个实例间进行负载均衡。比如一次放款提交请求,请求会经过 Web 客户端、Nginx、发债管理、审批管理这几个服务。
业务服务需要保持无状态,这样才能启动多个而不影响负载均衡的有效性,而各种中间件(如 ZooKeeper、RabbitMQ)一般有自己组织集群的协议,集群一般由 master 和 slave 组成,需要在 Nginx 中配置其中 master 节点的地址。
- 作为静态文件服务器。前端使用 React 开发,通过运行
- Radis 集群组成了缓存服务,因为系统中涉及到的业务大部分是读多写少的,因此缓存对提高效率是很有必要的;
- RabbitMQ 集群组成消息队列服务,消息队列可以解耦消息管理服务和业务服务,另外,消息队列也是实现异步调用必须的,消息队列提供重试、备份等功能,有利于实现可靠消息的最终一致性效果。
部分功能实现
我将大部分业务功能忽略了,这些功能中大部分都属于简单的 CRUD 操作,下面介绍一些技术性稍微强一些的功能的实现细节。
服务发现功能

服务发现功能的主要运行流程大体分成三个阶段,通过定时器来定时执行:
- 从 zk 服务器获取服务注册信息
在启动服务实例后,新建的服务实例会向 ZooKeeper 服务器发送该服务的注册信息,在 ZooKeeper 中这些信息作为存在于同一命名空间下的临时节点存在。 - 构建配置文件,并上传到 Nginx 服务器
服务发现服务器会定时地从 ZooKeeper 服务器获取微服务集群内服务的注册情况。 - 远程执行命令,更新 Nginx 服务器
在获取到服务的注册信息后,服务发现模块会将数据组织成 Nginx 配置文件的格式,并上传到 Nginx 服务器内,因为 Nginx 是运行在容器之内的,所以客户端需要通过 Docker 提供的 REST API 来操作容器来达到间接操作 Nginx 服务器的目的,在上传完毕后使用 Docker 容器运行命令的接口来执行 Nginx 重新加载配置文件的命令,至此完成服务上线的过程。
当实例退出集群时,代表其服务注册信息的临时节点会被自动清除,此时 Nginx 服务器经过同样的刷新过程将该实例移除出代理目标,由此完成服务的自动伸缩。
在实际环境中启动服务之前,需要先将项目打包成为 Docker 镜像,利用 Docker 技术只要服务器上安装有 Docker 环境即可启动应用,很大程度上减少了重复修改服务本身配置文件的麻烦,因为业务模块的框架是基于 SpringCloud 的,在启动后利用 SpringBoot 自动配置的便利,可以在初始化时调用 ZooKeeper 服务器提供的接口将服务注册到 ZooKeeper 的服务注册中心。服务发现模块的执行流程图如下图所示。
其中,更新 Nginx 配置文件的主要代码如下所示。
1 | // 构建nginx.conf配置文件 |
在将服务实例信息转换为 Nginx 配置文件后,需要循环遍历所有现存的 Nginx 服务器,对服务器地址的请求若出错需要一定次数的重试,尽可能地更新。
客户端或其他模块通过 REST 协议来访问服务的接口,访问请求由网关服务器进行拦截,再通过负载均衡技术来发布到某个服务的实例上。
放款更新功能

考虑多用户登录系统并同时对同一实体执行更新操作时,就有可能发生竞态条件。如果使用普通的加锁方式只能保证同一进程内的线程同步、不能保证多个服务实例进程间的互斥访问,解决办法是引入 ZooKeeper 的分布式锁和时间戳机制,在每次修改实体后更新实体的版本,并在每次对实体 ID 加锁后再与数据库中保留的最后一次修改时的版本进行校验,加锁将使得临界区代码在集群内只能被一个服务实例的线程调用,在修改完毕退出后更新实体版本,另一个线程进入后再根据版本进行校验,从而保证了服务间的并发写的一致性。
时间戳的实现比较简单,而分布式锁的实现则涉及到很多细节,已知的包括:
- 加锁操作的原子性、只有自己可以解锁自己、死锁、线程宕掉、耗时、失效时间、阻塞、可重入。
放款提交功能
发债模块在对单据进行提交操作时实际上需要调用审批服务提供的 RPC 接口,在提交后用户即可在审批模块中查找到这些单据,并可以对其进行审批或取消审批、驳回等操作。首先需要解释的是服务为何如此划分,需要结合企业的具体业务来考虑,因为审批是十分宽泛的场景,不只是发债单据需要审批,为了提高模块的可扩展性,将其划分出来作为单独的服务是合理的。放款提交操作的时序图如下图所示。
和其他增删改查操作相同的是,在具体的业务处理之前需要对放款进行加锁和版本校验,成功后发债服务会将该放款信息通过调用服务接口的方式提交到审批服务,审批服务会先根据放款的单据类型从数据库查找其审批流的注册信息及审批流,并成功便新增一条审批流实例到数据库,返回成功信息给发债服务,发债服务再根据返回值来修改放款的审批状态;如果查询或新增失败,审批会返回错误信息,使得发债服务也不会进行任何处理,或者处理后回滚到最初的状态。
发债模块并不了解审批模块内部的实现方式,二者使用相互独立的两个数据库,因此在执行审批操作时是可能发生不一致的情况的,为此需要引入 TCC 补偿机制,对提交操作需要提供一个 confirm 接口和一个 cancel 接口,代表统一的提交和回滚。
放款提交的具体执行过程如下图所示。
在登记放款页面点击提交按钮后会将放款单的 ID、版本号等信息发送到后台,程序的初步执行流程仍然是上分布式锁、校验版本号及设置新版本号和更新时间,接下来由于涉及到跨服务的写库操作所以会显得更加复杂。
首先服务调用方的发债服务需要生成本次调用的调用 ID,其作用之后再作论述,因为发债服务的本次调用是事务内的第一次调用,所以还需要生成一个链路 ID,用于标识一次事务,这些 ID 都需要全局唯一,所以和实体 ID 一样需要使用分布式唯一 ID 算法来生成。发债服务在调用审批服务的接口时,除了传递本来需要传递的单据信息之外,还需要将调用 ID 和链路 ID 打包一同传递,以便之后审批服务将 TCC 事务的参与信息上传到缓存中间件。事务的参与者分为根参与者和枝叶参与者,根参与者为事务的发起者,在这里即为发债服务,枝叶参与者包括事务通过传播到达的所有其余服务器,参与者包含的属性包括服务器本身的地址及 TCC 补偿事务所需的 confirm 接口和 cancel,只要某个服务接口需要添加事务属性,它就需要将自己的参与者信息上传到缓存中间件中,因此这里审批服务还有一个上传参与者信息的过程。实现 TCC 补偿事务中根参与者执行流程的关键代码如下所示。
1 | private Object interceptRoot(Participator participator, MethodWrapper methodWrapper) |
在前面的准备工作完成后,审批服务正式进入业务处理流程,首先需要根据登记放款的单据类型去数据库中查找审批流注册信息,因为审批存在多级审批的场景,因此每条审批流关联了自己下一阶段的审批流,这里为了创建审批流实例需要找到源头第一条审批流,并将发债传递来的单据信息填入即可得到审批流实例。
保存审批流实例时不能直接保存到实体本身代表的数据库表中,而是要暂时保存到一个 dr 表中暂存,表名为“实体名_dr”,因为此时事务并没有完成,如果直接保存到实体表中,直接去审批流页面查询是能查出的,也就是说会发生“脏读”的现象,暂时保存到这个暂存表中,还可以作为日志,供系统发生故障时手动恢复之用。审批服务执行完毕之后,发债服务需要使用其返还值来更新发债数据库中的放款状态。但是事务还未完成,因为审批服务还没有将审批实例实际保存到实体表中,发债服务需要先使用链路 ID 从缓存中间件中获取所有事物参与者信息,然后根据提交操作是否成功来决定是调用 confirm 还是 cancel,这里 confirm 的逻辑是将 dr 表中的审批流实例转移到实体表中,而 cancel 是将该审批流实例从 dr 表中移除、发债服务回滚。
为了应对偶尔的网络不稳定等情况,根参与者需要在异常发生时再重试一定的次数,另外,试想如果请求的超时也被当成故障处理了,那么多次的写操作很有可能会为系统引入脏数据了,因此 confirm 和 cancel 接口需要额外地保证接口的幂等性,为了校验接口是否被多次调用,需要客户端在发出请求时带上此次请求的调用 ID,服务端需要缓存调用 ID 并对请求的重复性进行校验。
最后发债服务释放放款 ID 上的锁,完成一次提交操作。其他审批接口、结算管理的相应接口实现思路是类似的,在此不另加论述。
总而言之,提交操作是需要跨服务写库的,除了在修改操作的加锁和版本校验之外,还需要注意TCC 的执行流程:
- TCC 事务需要每个参与者提供 try、confirm 和 cancel 三个接口,try 执行资源的预留,比如对涉及的实体加锁,也起着服务验活的功能,confirm 执行事务的提交,也就是真正地执行业务操作、将数据持久化到数据库,cancel 需要释放预留的资源;
- 每个事务参与者将自己的信息提交到 Redis 缓存内,之后根参与者需要取得所有参与者信息,主要是它们的 confirm 和 cancel 接口的地址;
- 根据 confirm 执行情况,有:
- 如果业务操作都成功了,由第个参与者来调用所有其他参与者的 confirm 接口来提交事务;
- 如果业务操作失败了,同样由第一个参与者来调用所有其他参与者的 cancel 接口来回滚事务。
调用 ID 和链路 ID 的作用,前者可以用于保证接口调用的幂等性,后者主要用来定位事务内的参与者。
用一个常见的用户购买商品场景为例,需要先确保用户能够支付,然后锁住用户和商户的账户,这是 try 阶段;如果 try 成功,即预留资源成功了,接下来再对用户账户扣款、商户账户入账,如果因为超时等原因失败了,需要事务补偿,即重试,这是 confirm 阶段;如果 try 失败,则释放所有的锁,这是 cancel 阶段。
改进思路
当前的系统仍存在很多可改进的地方。
服务发现功能
使用 Eureka 等高可用服务发现产品替代 ZooKeeper
ZooKeeper 集群通过 Zab 协议保证高一致性,重新选举 Leader 比较耗时,且当节点数量不足以构成容错集群时,ZooKeeper 倾向于返回空;故提出改用 Eureka 等其他倾向于提供高可用性的具有服务发现功能的产品。
使用复制和 DNS 等手段工具提升 Nginx 服务器的可用性
Nginx 服务器作为网关,存在单点故障风险,但是这里的服务发现只能保证被 Nginx 代理的那些服务能弹性伸缩,对 Nginx 本身却没有什么办法,就算复制了 Nginx 服务器,客户端也只能发到一个 IP 上。这里提出使用基于操作系统的方案对 Nginx 集群实现验活及负载均衡,主要是 Keepalived 等软件或独立的 DNS 服务器,但是论文题目限于 Saas 层展开,本人水平有限没法解释。
服务间通信功能(RPC)
使用 TCP 等更底层、灵活的协议
HTTP 是应用层的,Spring Boot 封装了一个 RestTemplate 可以很方便地发 HTTP 请求。而 TCP 是传输层的,如何包装消息需要另外再讨论,常见的框架如 Netty,提供了长连接、心跳检测等功能,可以提高开发效率。
使用 Kryo 等更完善的序列化工具
Kryo 是一个优秀的 Java 序列化方案,大概用了很多优化方案,这就是很零碎的编程问题了。
TCC 的 confir 和 cance 都有可能出错,一般都需要手动恢复,异常日志指的是 redo 和 undo 日志,redo 是未执行前的数据值,undo 是执行修改后的数据值。
服务间一致性(TCC 事务)
考虑 TCC 事务发生异常的情况,做好 redo/undo 日志,供出错时手动执行恢复。